
[ad_1]
Google Tag Supervisor (GTM) is a strong, free device supplied by Google that permits web site homeowners and entrepreneurs to handle and deploy advertising tags (snippets of code or monitoring pixels) on their web site (or cellular app) with no need any coding expertise.
In different phrases, it’s a tag administration system that allows you to rapidly and simply replace measurement codes and associated code fragments collectively often called tags in your web site or cellular app.
Why would somebody wish to use Google Tag Supervisor?
GTM simplifies the method of monitoring person interactions by offering a user-friendly interface to implement monitoring codes, all with out the fixed want for a developer’s help. Whether or not you need to observe fundamental analytics, monitor particular occasions like type submissions or clicks, or implement extra complicated remarketing campaigns, GTM could be a useful asset. It permits for better agility within the digital advertising realm; you possibly can take a look at and deploy tags with out having to depend on the IT division to write down and launch code, making all the course of rather more environment friendly.
Moreover, GTM helps a wide range of tags for various advertising platforms, not simply from Google’s suite of instruments. This compatibility extends its utility as a centralized device for managing a wide range of completely different advertising knowledge streams. With the power so as to add, edit, and disable tags at a second’s discover, entrepreneurs acquire a big quantity of management over their knowledge assortment and reporting processes.
In a nutshell, for anybody trying to streamline their web site’s code and improve their advertising efforts with minimal technical necessities, Google Tag Supervisor is an indispensable device.
Now, let’s stroll by means of how you can set up Google Tag Supervisor in your web site. It solely takes 4 steps and you could be achieved in about 10 minutes.
Step 1: Create A Google Tag Supervisor Account
Getting began with Google Tag Supervisor is simple, and step one is to arrange an account. If you have already got a Google account for providers like Gmail, Google Drive, or Google Analytics, you should use the identical account to check in to Google Tag Supervisor. If not, you’ll must create a brand new Google account.
- Go to Google Tag Supervisor. Open your net browser and go to the Google Tag Supervisor web site (tagmanager.google.com). Right here, you’ll be greeted with the choice to check in or create an account.
- Register or join. Click on on the “Register” button when you have an current Google account, or select “Create account” if you must make a brand new one. Observe the on-screen prompts to check in or to create your new Google account.
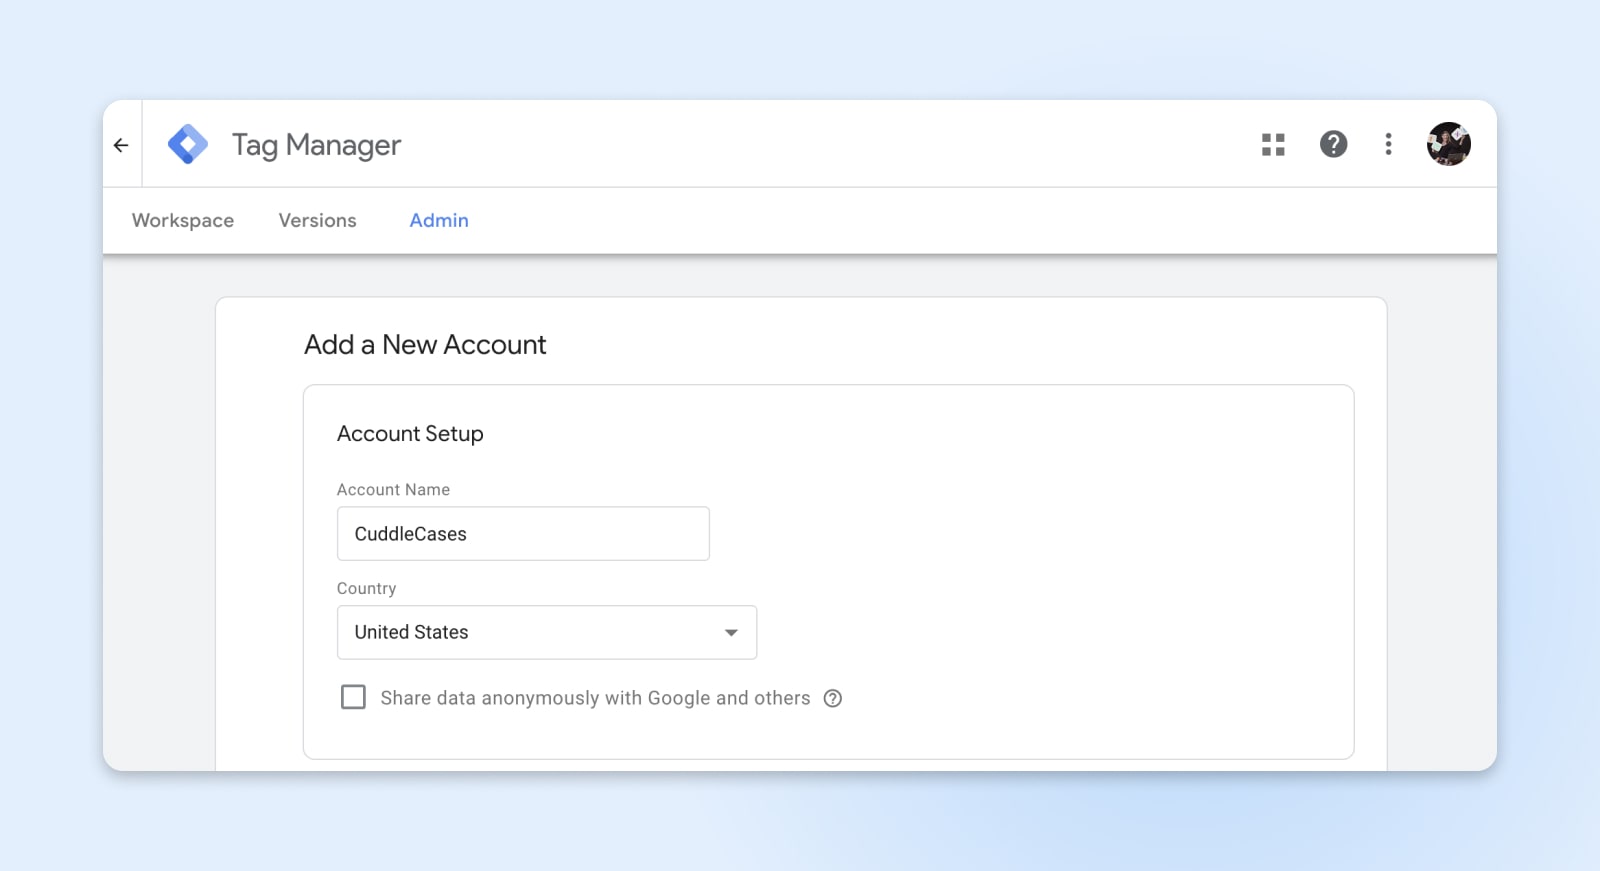
- Create your GTM account. As soon as signed in, you can be prompted to create a brand new GTM account. Click on on the “Create Account” button positioned within the high proper nook.
- Enter your account particulars. You will have to supply a reputation in your GTM account. Google recommends solely having one GTM account per firm, even when you have a number of web sites, so that is sometimes the title of your organization or group. Beneath the identical part, you can be requested to pick your nation.
The subsequent step might be to arrange and set up a container and tags in your web site. There are a couple of alternative ways you are able to do this, and we’ll stroll you thru two straightforward methods beneath.
Get Content material Delivered Straight to Your Inbox
Subscribe to our weblog and obtain nice content material identical to this delivered straight to your inbox.
Step 2: Set up Google Tag Supervisor Code On Your Website (2 Strategies)
Earlier than you possibly can set up GTM in your web site, you’ll want to complete organising your account by making a container. The container is the piece of code you add to your web site to make Google Tag Supervisor work. You sometimes create a singular container for every web site you put in GTM on, so if you get to the subsequent part within the account setup stream, the place you enter your “Container Title,” you’ll sometimes select your web site title or URL.
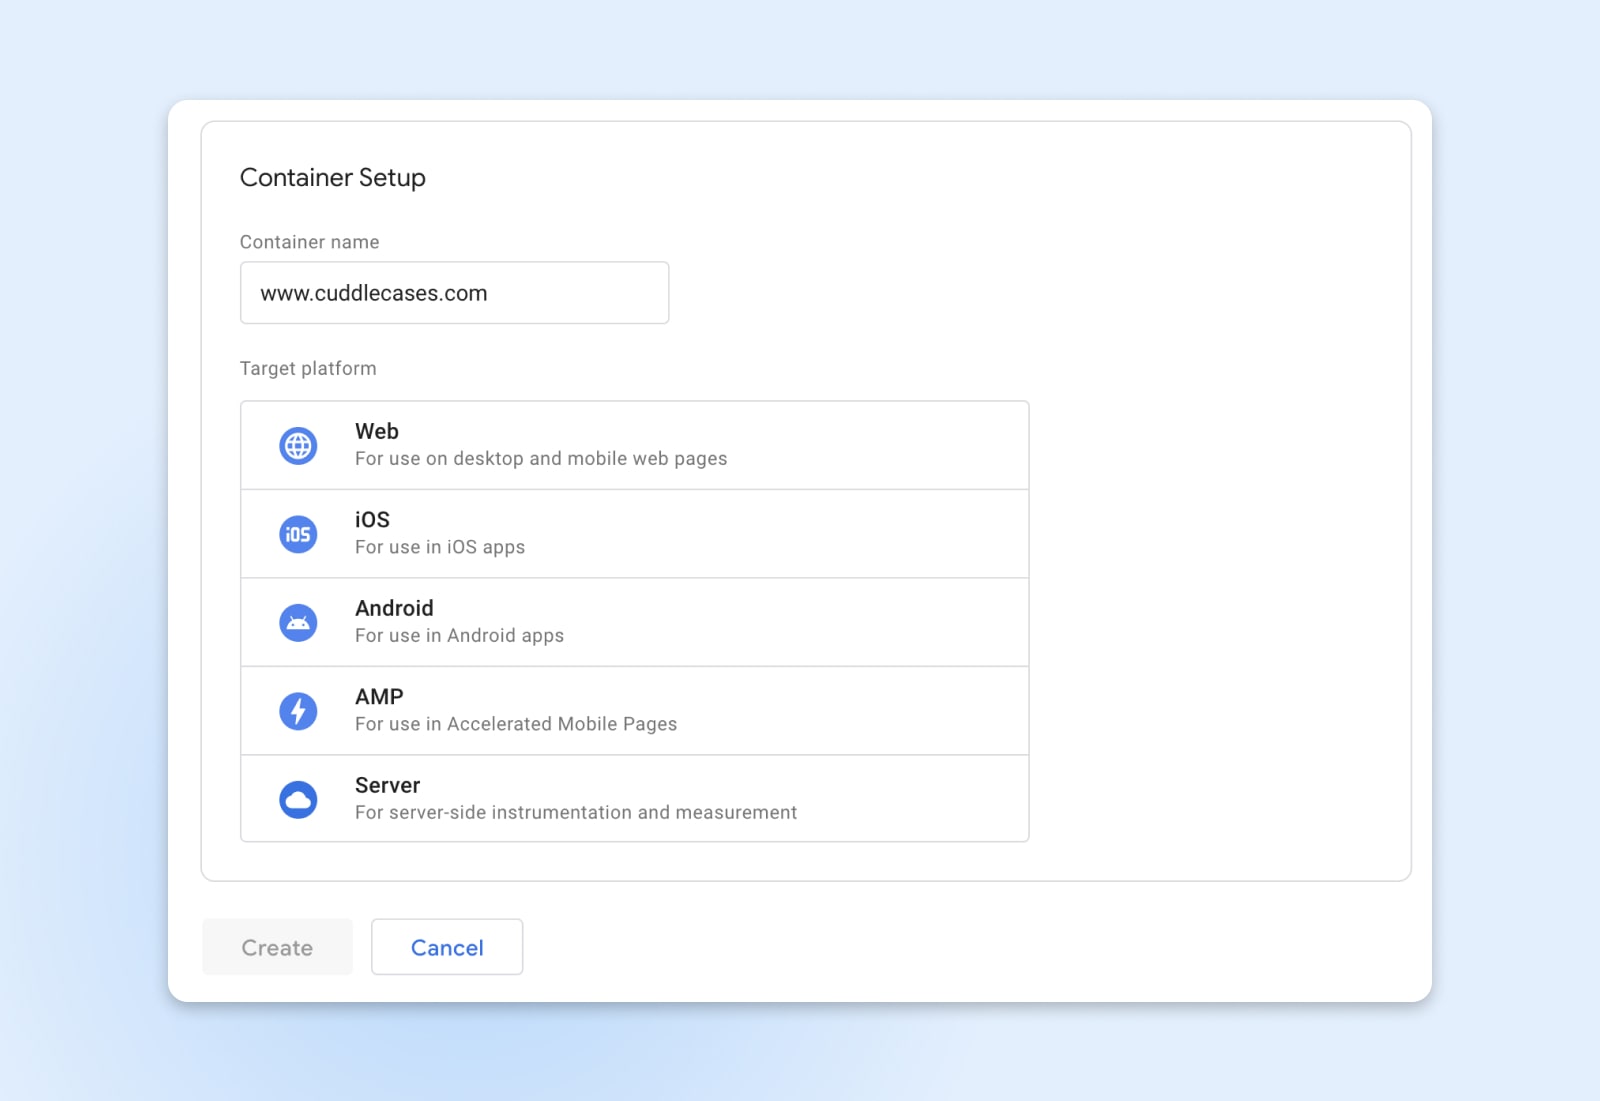
Subsequent, you’ll choose your “Goal Platform.” For web sites, select “Net.”
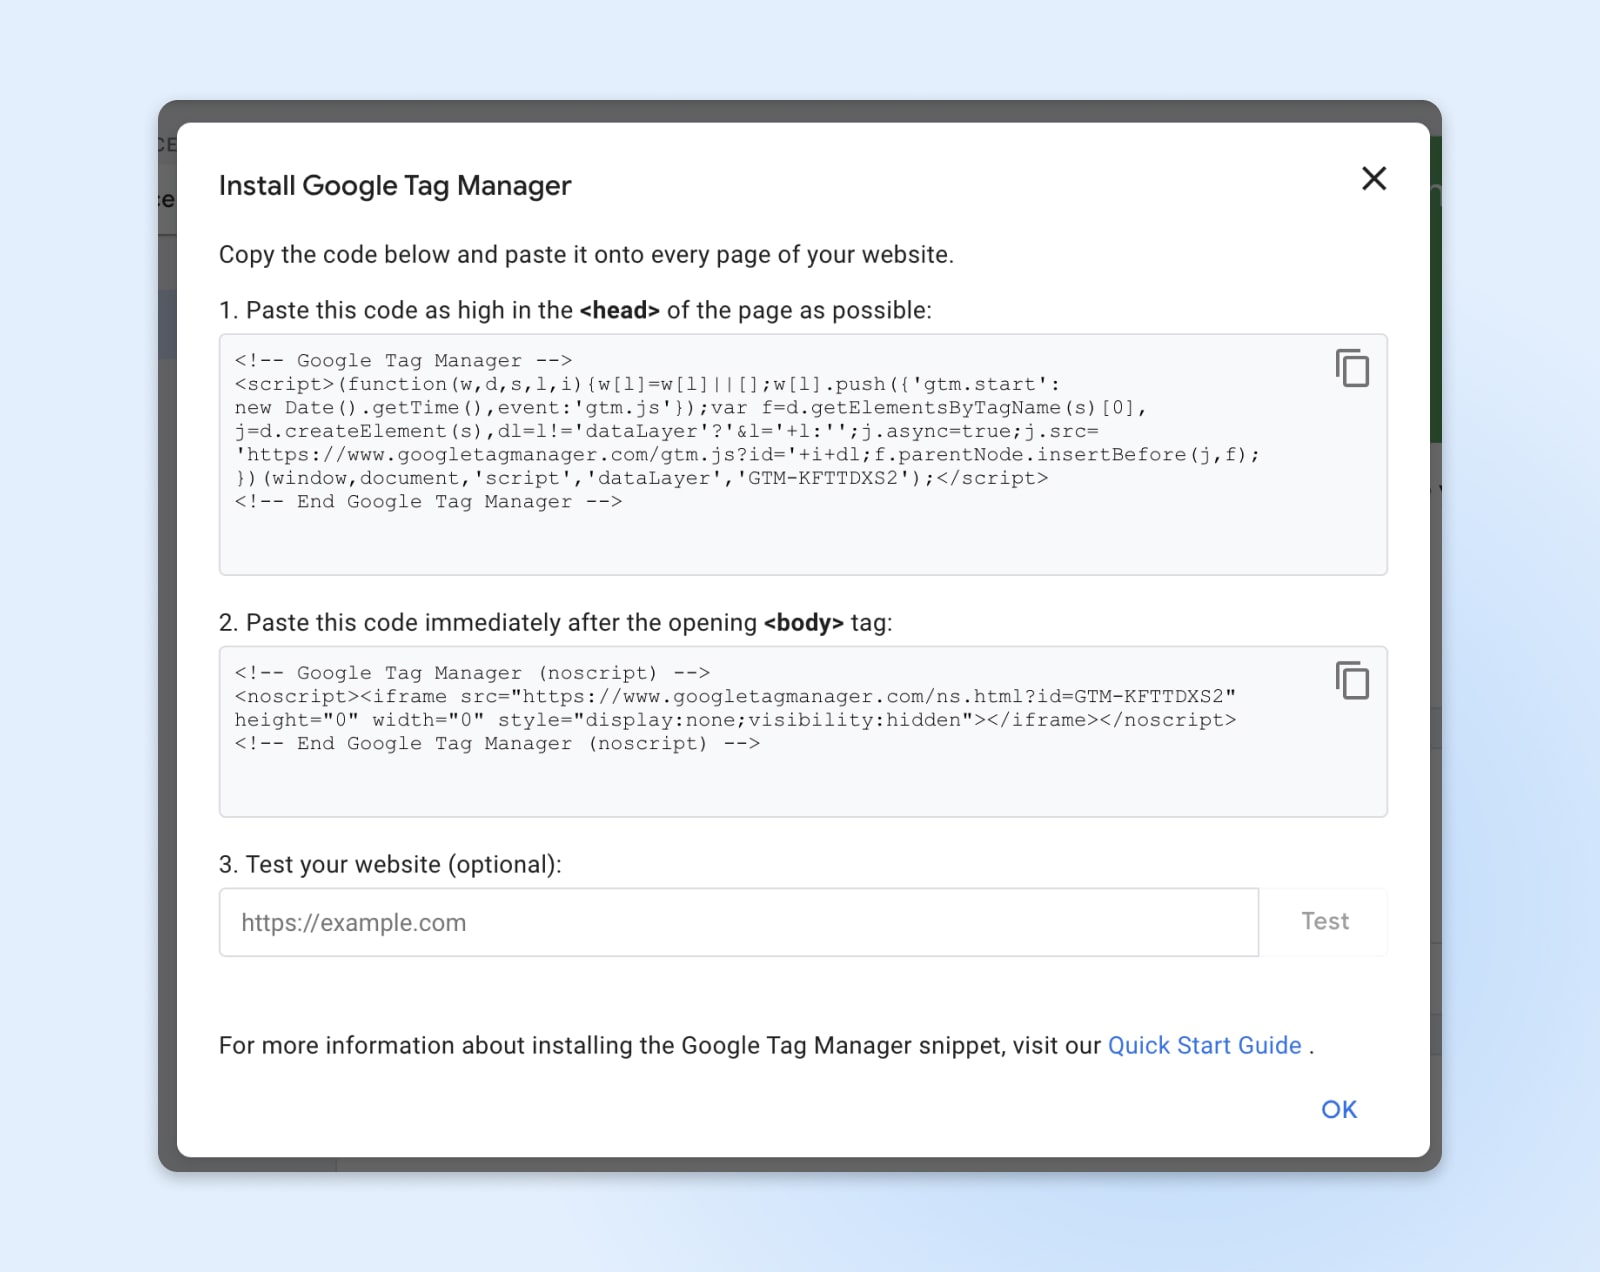
Lastly, click on “Create.” This may finalize your account and create your first container. You’ll see two pop-ups:
- The primary one is the Google phrases of service. Examine the field on the backside of the web page and click on “Sure” on the high proper nook to just accept them.
- The second is a how-to information, which incorporates the code snippets you’ll want to put in your container in your WordPress web site. It additionally explains the place to repeat and paste the container code, however extra on this beneath.
#1: Manually Add GTM Code
So as to add the container to your WordPress web site manually, you’ll want to repeat these items of code from the pop-up and paste them into your web site’s supply code.
Right here’s what to do:
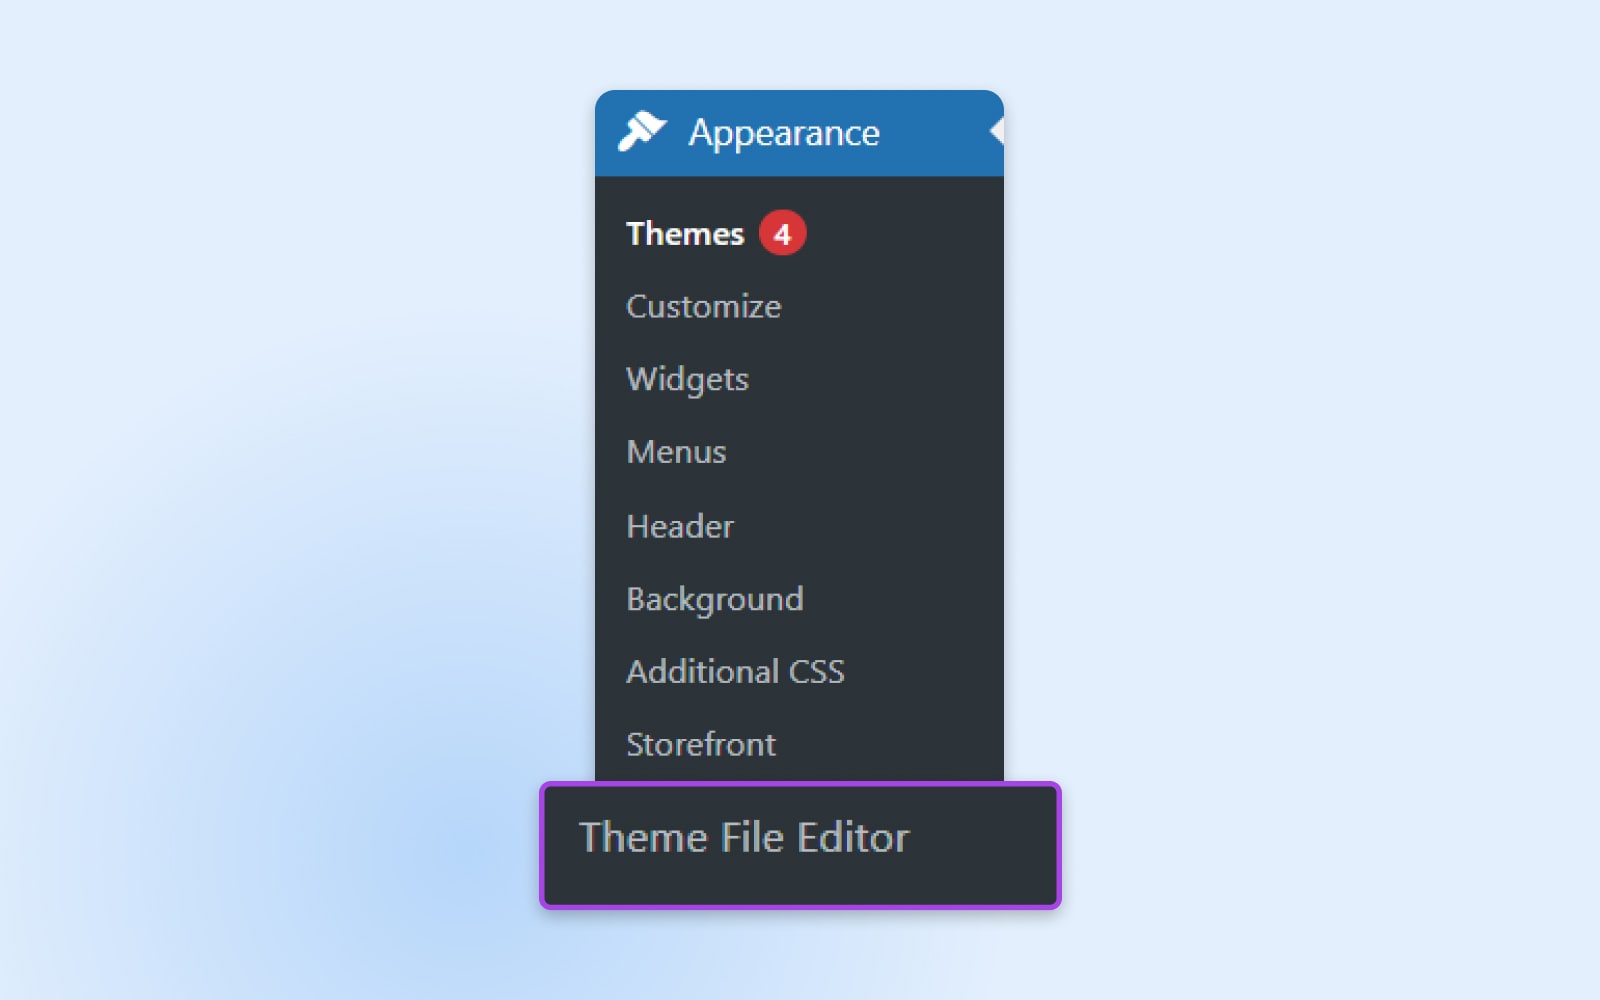
Log into your WordPress account. What you do subsequent will fluctuate relying on the model of WordPress you employ, your internet hosting firm, and your theme, however you must discover the supply code in your theme information.
The navigation bar on the precise is an effective place to start out. Search for “Theme File Editor” both beneath Appearances or Instruments. Should you can’t discover the supply code, skip to Choice #2, which is far simpler for freshmen.
Theme Editor
The WordPress theme editor is a textual content editor that allows you to edit a theme’s information straight from the admin dashboard. You should use the editor to add new information and take away any undesirable ones.
Since WordPress themes fluctuate in design and performance, their theme code might fluctuate, too. You’re searching for the file for the header. A typical title for it’s header.php. Should you can’t discover it, contact your theme developer for assist.
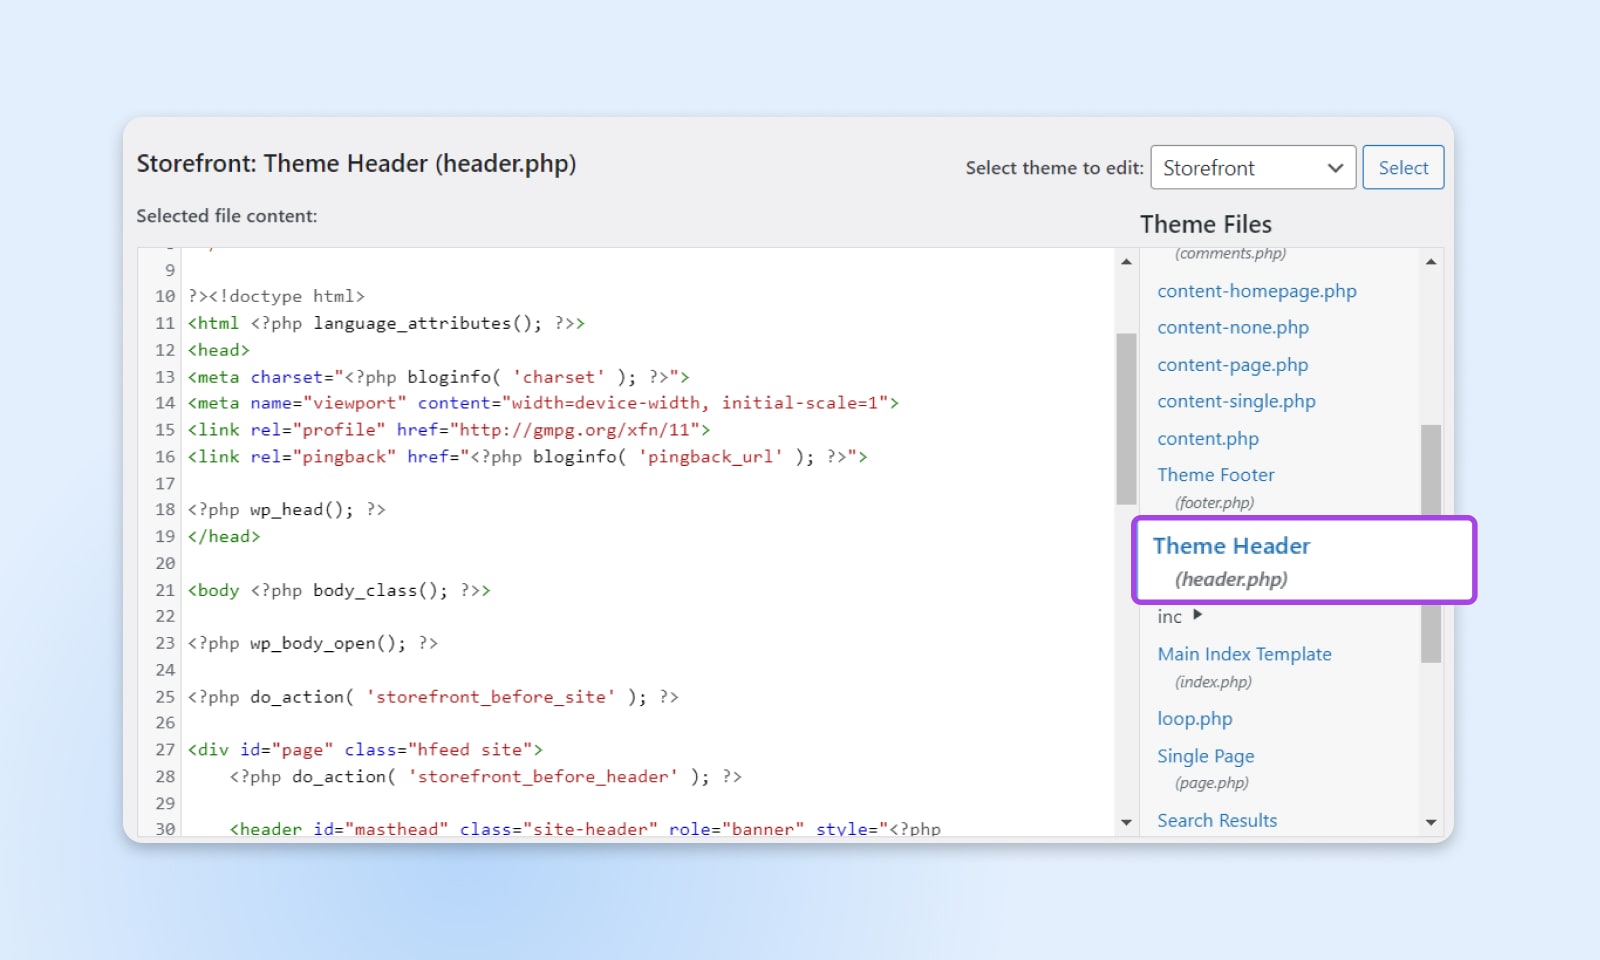
Contained in the header file, discover the <head> and </head> tags. Copy the primary code snippet in your container and paste it as excessive up within the <head> part as doable.
Subsequent, discover the <physique> tag. Copy the second code snippet in your container and paste it proper after the opening <physique> tag.
Click on “Replace File” to avoid wasting your adjustments.
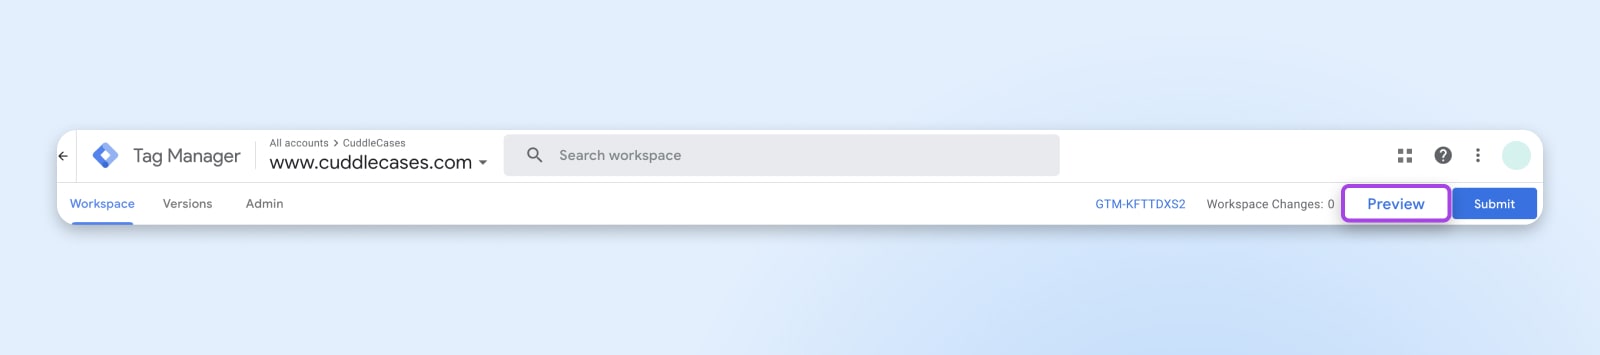
Return to GTM and click on “Preview”. This may open a brand new window to attach Google Tag Assistant to your web site. Enter your web site URL and click on “Join”.
A brand new window to your web site will open, and Google Tag Assistant will notify you if the connection is profitable. As soon as it’s related, click on “End”, return to the earlier window, and click on “Proceed”. It is best to see “Google Container Discovered” on the high of the display screen, which signifies that set up of GTM in your WordPress web site is full.
Click on the “Submit” button. Enter the model title and click on “Publish”.
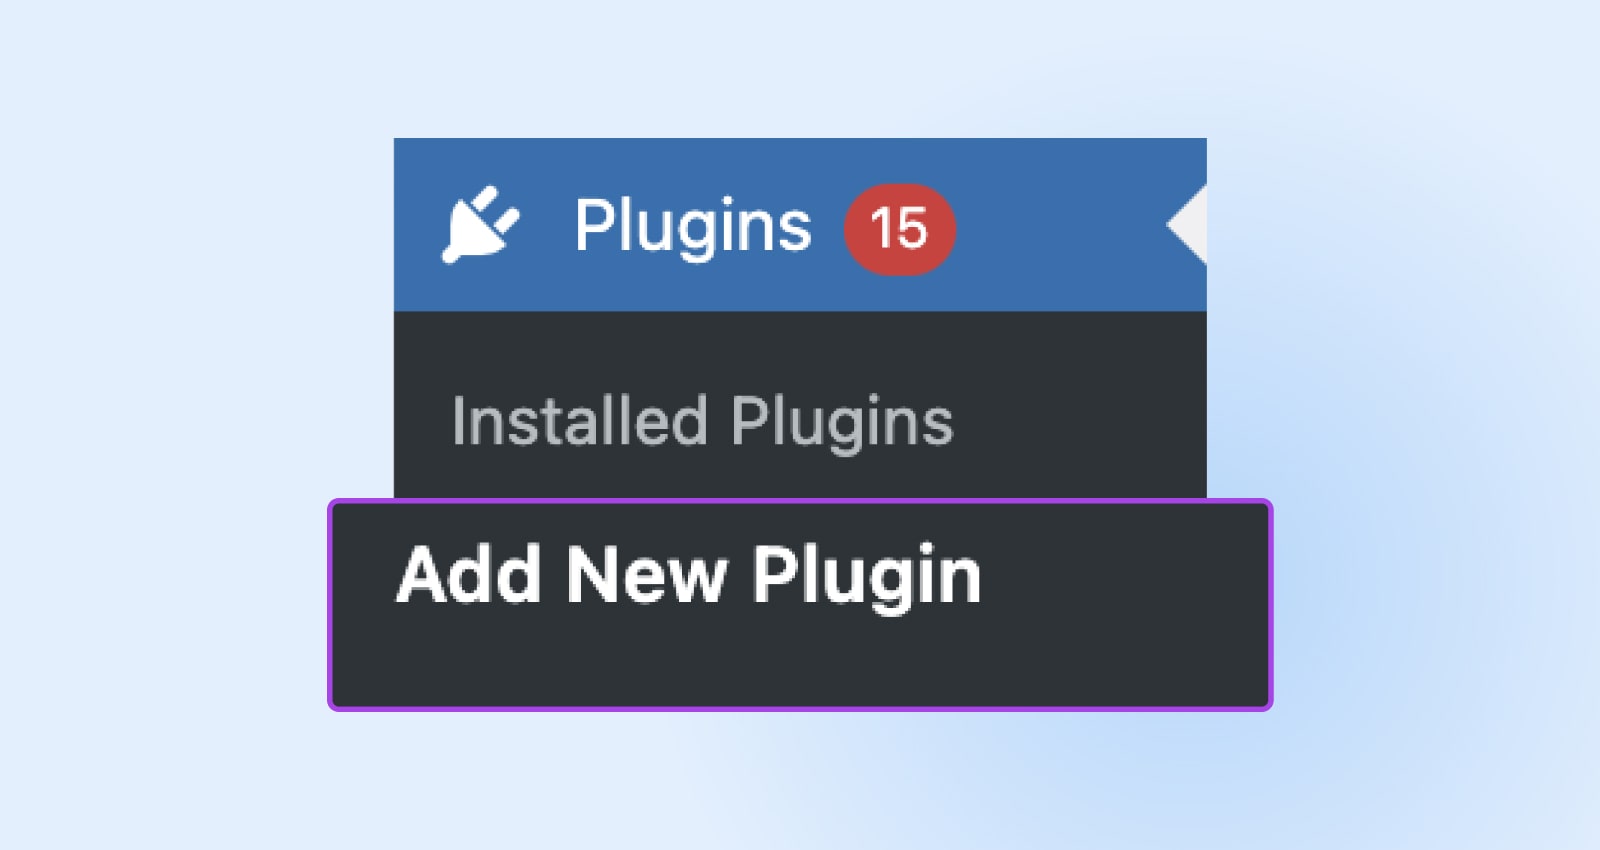
#2: Use A Plugin To Set up GTM
The second technique for putting in GTM on a WordPress web site is utilizing a plugin. This technique doesn’t require you to edit your web site’s supply code, so it might be extra appropriate for freshmen.
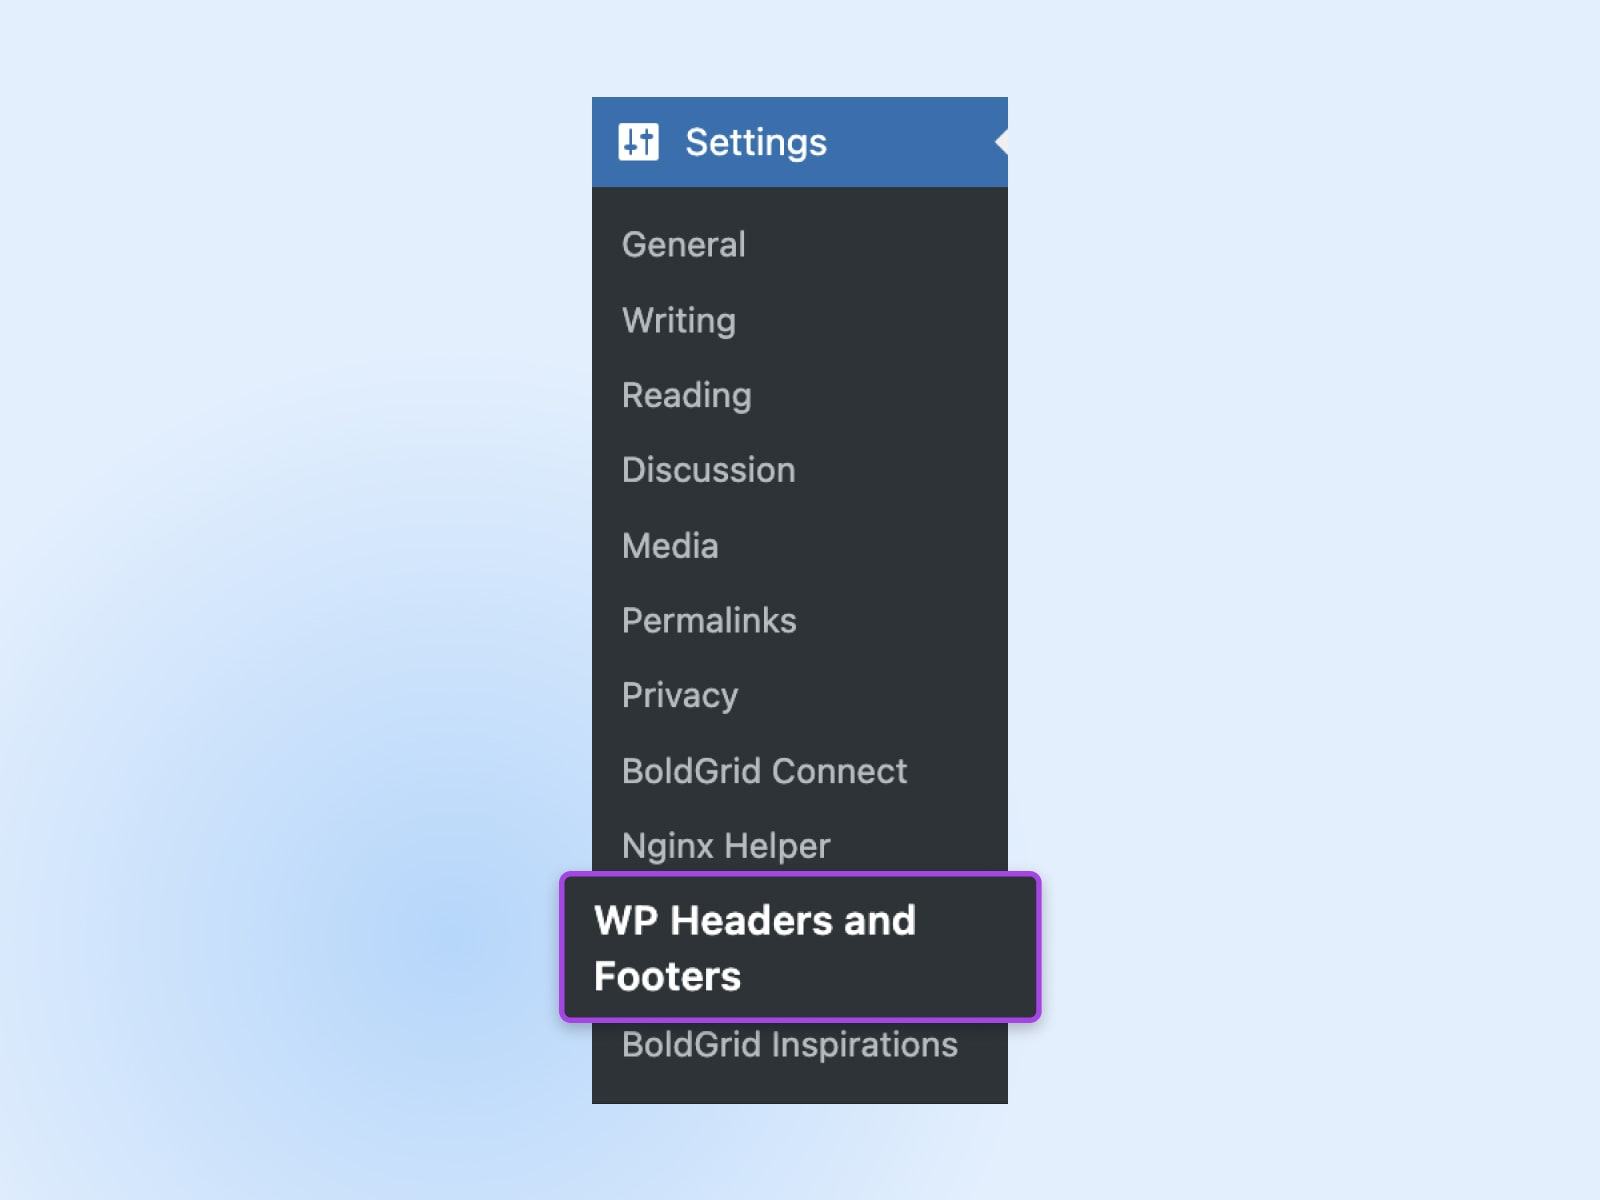
A easy, free plugin to make use of for that is Insert Headers And Footers. After creating your GTM account and organising your container, right here’s what to do:
Go to your WordPress admin web page. Navigate to “Plugins”, then “Add new”, and seek for “Set up Headers and Footers.” As soon as you discover it, click on “Set up Now.”
Go to “Settings”, then “Insert Headers and Footers”.
Copy the code snippets from the containers in your GTM account and paste them into the corresponding containers in “Insert Headers and Footers”.
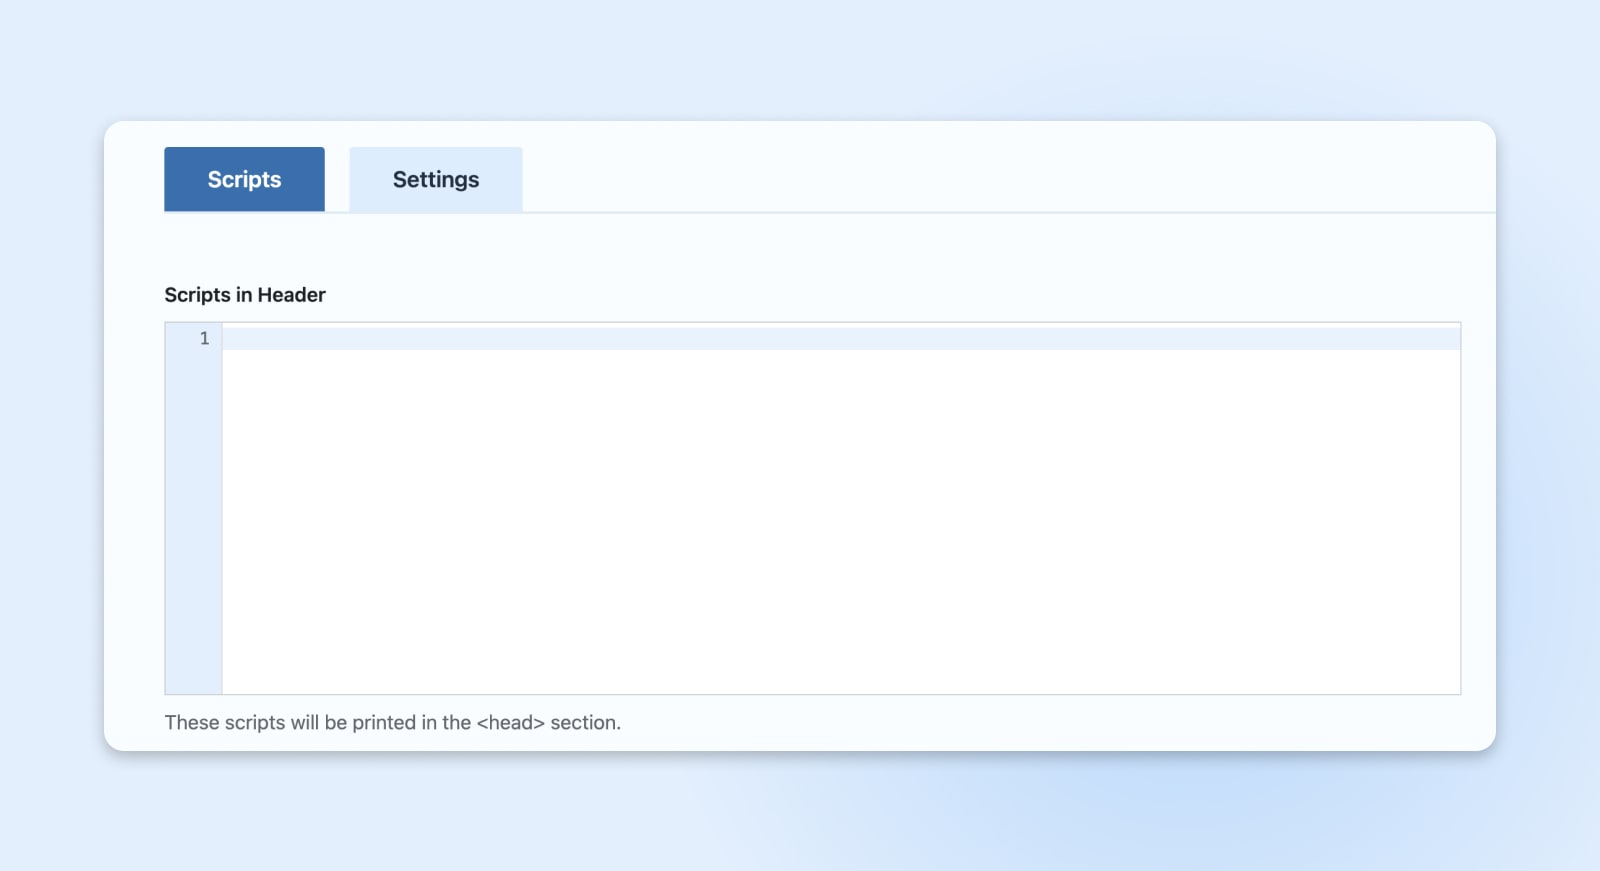
Click on “Save”.
Step 3: Add A Tag
With Google Tag Supervisor code put in in your web site, you’re now prepared to start out including tags. Tags can be utilized for a wide range of functions, from monitoring web site analytics to remarketing and conversion monitoring. Right here’s how you can add your first tag:
Go to the Google Tag Supervisor dashboard (https://tagmanager.google.com/ and choose the Container Title you simply created.
Click on on the “Add a brand new tag” button.

Should you’re simply beginning, you would possibly wish to create a Google Analytics monitoring tag. This is without doubt one of the commonest methods to make use of GTM, and GA4 offers tons of the way to make use of tags to trace real-time web site knowledge and metrics. For a GA4 tag, title it one thing descriptive like, “GA4” or “GA4 Configuration.”
Within the Tag Configuration field, choose “Google Tag”. Within the Tag ID discipline, enter your Google tag ID. Click on “Save”.
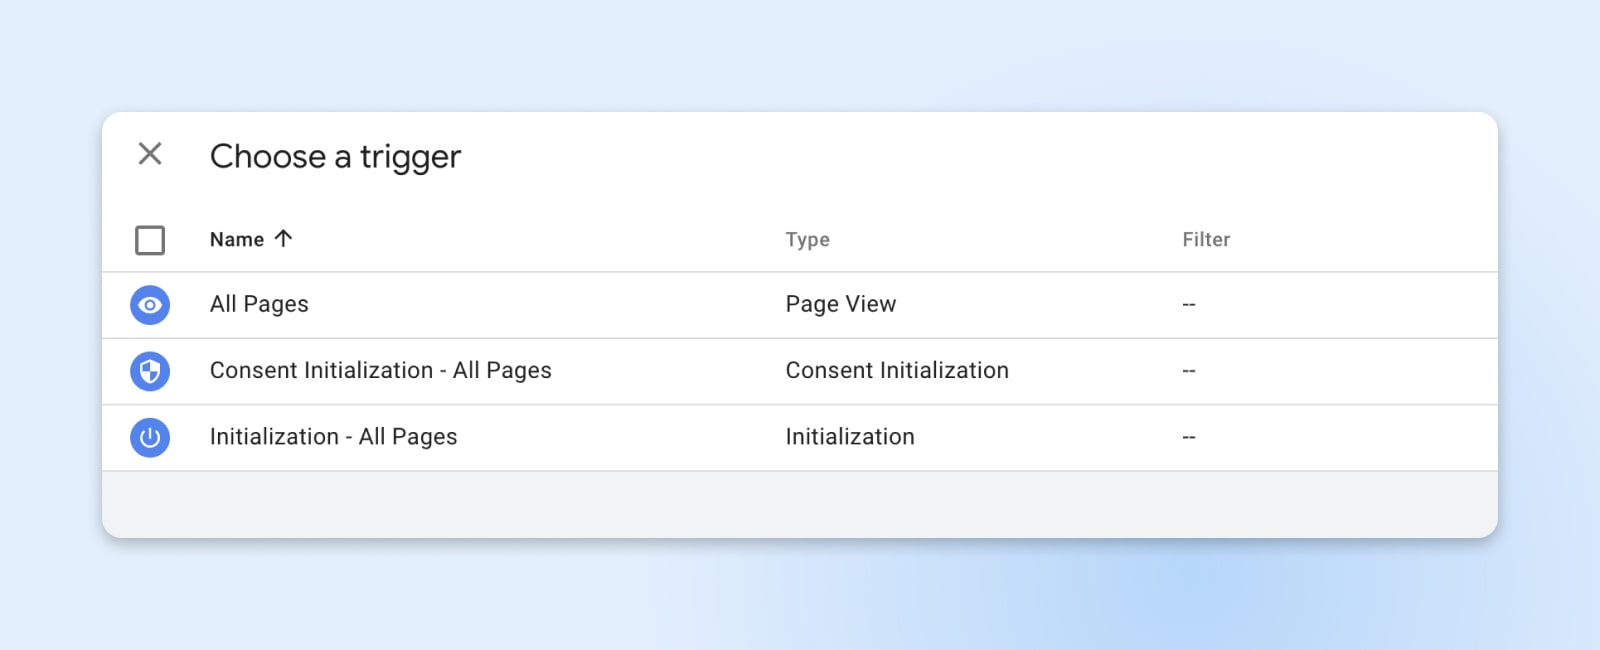
After configuring your tag, you must outline when it’ll hearth. Click on on the “Triggering” part and select a set off. For instance, to trace all web page views, you’ll choose the “All Pages” set off. Triggers could be as broad or as particular as you need – GTM offers you quite a lot of management.
Step 4: Confirm GTM Is Put in & Sending Knowledge
Earlier than you save and publish your tags, it’s essential to make sure the whole lot is working accurately. Right here’s how one can confirm that GTM is put in correctly and the tags are sending knowledge:
GTM gives a built-in Preview mode that permits you to see which tags are firing in your web site. Click on “Preview” on the GTM dashboard in your web site, enter your web site’s URL, after which navigate to your web site. You will notice a debug window on the backside of your web site that exhibits which tags are firing and which aren’t.
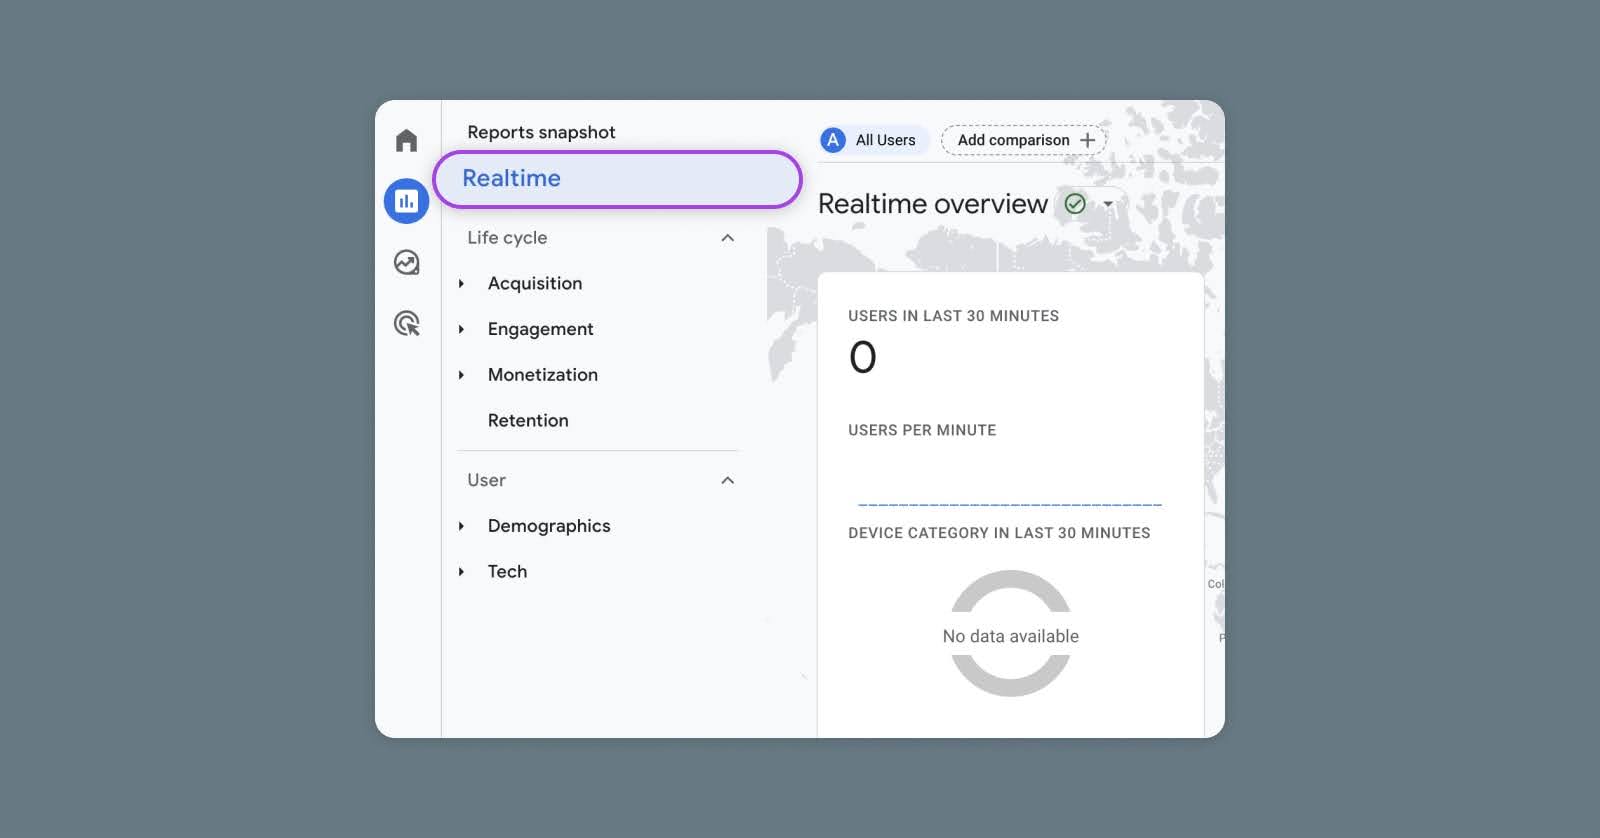
Subsequent, you possibly can search for real-time knowledge in Google Analytics. Should you’ve arrange a Google Analytics tag in GTM, go to your Google Analytics account and navigate to the Realtime report. Should you see lively customers in your web site (you might must navigate round your web site to generate knowledge), this means that GTM is accurately sending knowledge to Google Analytics.
For a extra technical examine, you should use your browser’s developer instruments to examine the community requests being made when a web page in your web site masses. Search for community calls to ‘google-analytics.com’ or different related domains, which might verify that tags are firing.
By taking these steps, you’ll have the ability to confidently verify that Google Tag Supervisor is put in accurately and that your tags are gathering and sending knowledge as anticipated. If there are any points, the data supplied by these verification strategies may enable you troubleshoot any issues.
Incessantly Requested Questions
Can I set up Google Tag Supervisor on completely different sorts of websites?
Sure, Google Tag Supervisor could be put in on all sorts of web sites, together with these constructed with HTML, PHP, WordPress, Shopify, and different content material administration techniques or e-commerce platforms.
Can I exploit a plugin for my CMS to put in Google Tag Supervisor?
Completely. Many content material administration techniques, like WordPress, have plugins obtainable that make integrating Google Tag Supervisor simpler. Simply seek for GTM plugins inside your CMS’s plugin repository.
The place does the Google Tag Supervisor code go on my web site?
The Google Tag Supervisor code snippet consists of two elements. The primary half needs to be positioned as near the opening <head> tag as doable on each web page, and the second half needs to be instantly after the opening <physique> tag.
What’s the distinction between Google Analytics and Google Tag Supervisor?
Google Analytics is a device that collects and experiences knowledge about web site site visitors and person interactions. Google Tag Supervisor, however, is a tag administration system that means that you can simply replace and handle advertising tags (together with Google Analytics monitoring code) with out altering the code in your web site. Basically, Google Analytics measures your web site’s efficiency, whereas Google Tag Supervisor helps you streamline the method of deploying and managing the tags that accumulate the information.
Get Extra Guests, Develop Your Enterprise
Our advertising consultants will enable you earn extra site visitors and convert extra web site guests so you possibly can concentrate on operating your corporation.

[ad_2]