
[ad_1]
✔️ Elliott Wave Counter MT4©: https://www.mql5.com/en/market/product/14016
✔️ Elliott Wave Counter MT5©: https://www.mql5.com/en/market/product/15081
Most of those that commerce in Foreign exchange are conscious of the Elliott Wave Evaluation System.
So what is that this wave evaluation: That is the examine and evaluation of worth, and never its derivatives (numerous indicators); The power to find out worth targets utilizing Fibonacci instruments (Elliott waves are carefully associated to Fibonacci numbers).
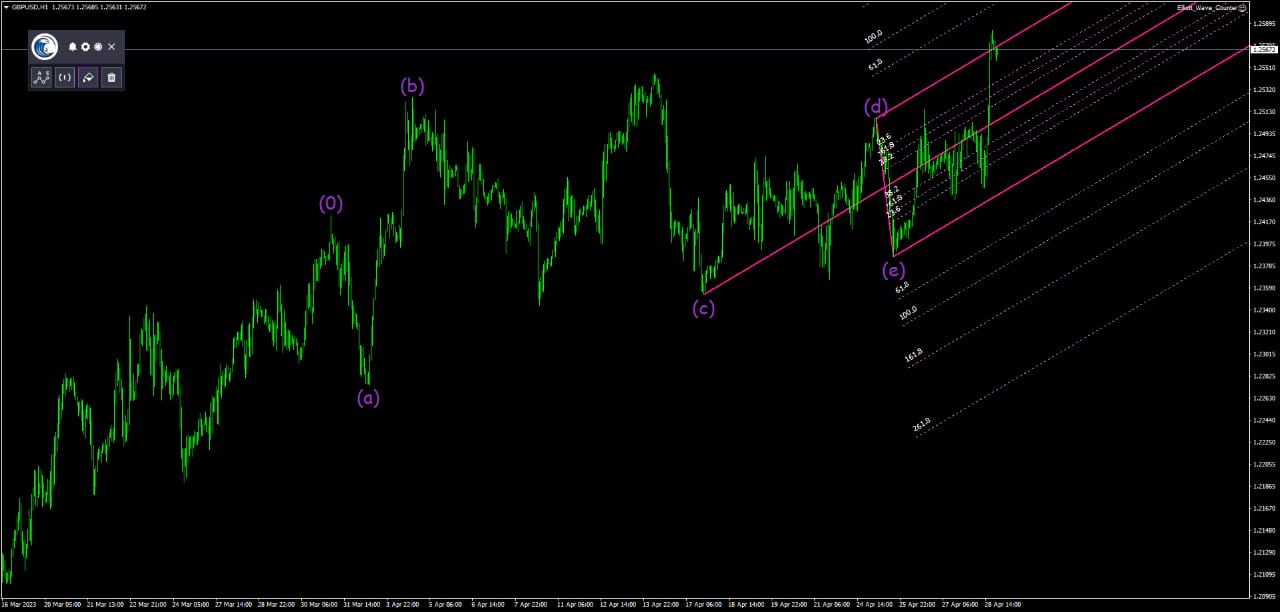
Elliott Wave Counter is a panel for fast and user-friendly handbook markup of Elliott waves. One can choose a coloration and a degree of marks. There are additionally capabilities for eradicating the final markup and the complete markup made by the instrument. Markup is made in a single click on. Click on 5 instances – have 5 waves! Elliott Wave Counter shall be an important instrument each for rookies {and professional} analysts of Elliott waves.
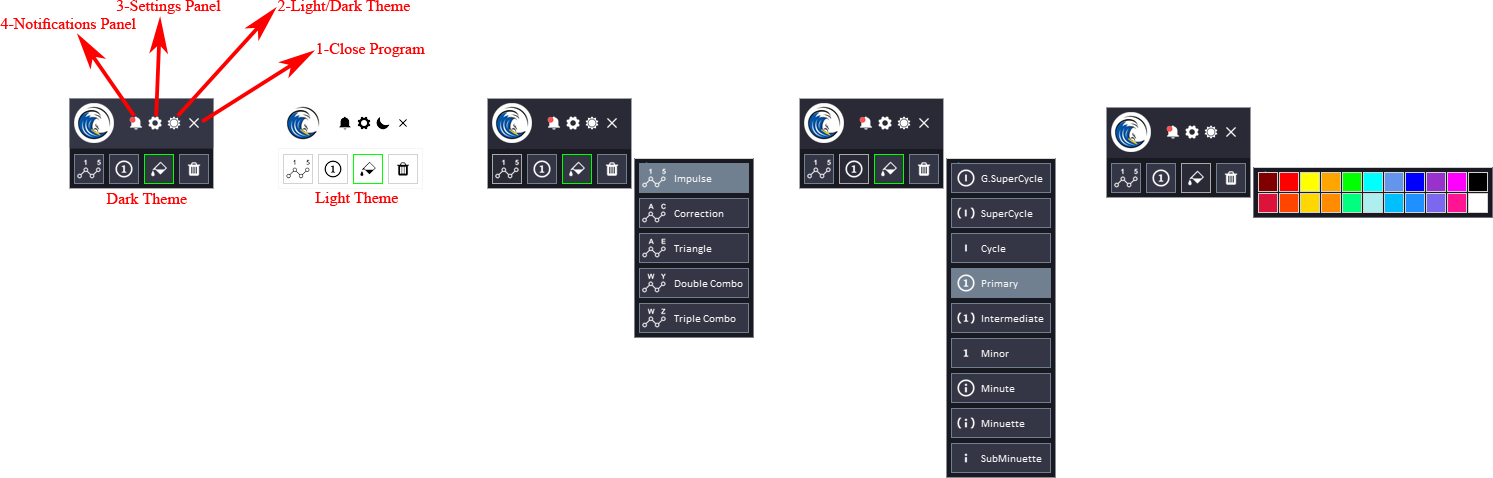
Foremost Panel Clarification:
-
Shut EA Button: This button is used to cease the Professional Advisor (EA) and take away it from the chart.
-
Mild/Darkish Button: This button is used to modify between a light-weight and darkish theme for the panel. This button will be useful if you happen to discover one of many themes too shiny or too darkish and wish to change to the opposite one.
-
Settings Panel Button: This button is used to open the settings panel for the EA. The settings panel lets you configure numerous settings for the EA.
-
Notifications Panel Button: This button is used to open the notifications panel for the EA. The notifications panel shows vital notifications.
-
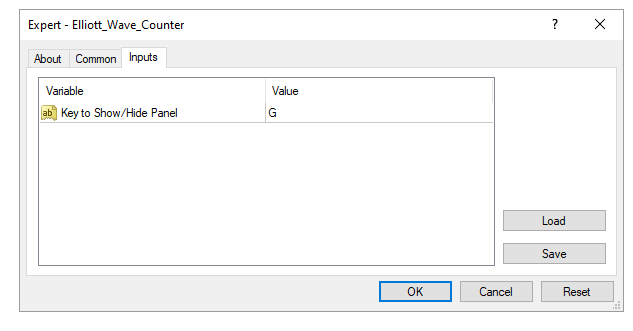
Present/Cover Panel Key: a shortcut to indicate and conceal panel through the use of your keyboard.
Normal Inputs:
- Wave Sort Button: This button permits customers to pick the kind of wave sample they wish to spotlight on the chart. The choices accessible embody impulse waves, corrective waves, and different customized wave patterns.
- Wave Stage Button: This button permits customers to pick the extent of wave sample they wish to spotlight on the chart. The choices accessible embody main, intermediate, and minor wave ranges.
- Wave Colour: This button permits customers to decide on the colour of the wave patterns they wish to spotlight on the chart. Customers can choose from a spread of colours to swimsuit their desire.
- Delete All Button: This button permits customers to delete all chosen objects on the chart, together with any wave patterns which have been marked utilizing the Elliott Wave Counter.
How this system works:
First, Choose the kind of wave sample you wish to spotlight on the chart utilizing the Wave Sort button. The choices accessible embody impulse waves, corrective waves, and different customized wave patterns.
Choose the extent of wave sample you wish to spotlight on the chart utilizing the Wave Stage button. The choices accessible embody main, intermediate, and minor wave ranges.
Then if you must change the colour of the wave, you may select the colour of the wave patterns you wish to spotlight on the chart utilizing the Wave Colour button. This lets you customise the looks of the wave patterns to fit your desire (this can provide help to to distinguish between alternate wave counts).
The instrument is able to begin marking, after clicking, you may place labels on the chart by transferring the mouse and urgent the draw shortcut. Merely transfer your mouse to the specified bar the place your wave begins. A curser line will point out the bar that you’re pointing at. When you place your mouse beneath the bar the low of the bar shall be used as worth reference, if you happen to place your pointer above the bar the excessive of will probably be the worth reference. Make a click on when prepared.
After setting the wave’s begin level, the primary wave will seem beneath the mouse. This might be 1, A or W relying upon the sample that you’re counting. In the identical method, set the purpose for putting the primary wave. Irrespective of how excessive or low you place your wave, the curser line shall be your wave’s time reference, and the excessive (if you happen to clicked above the bar) or the low (if you happen to clicked beneath the bar) shall be your wave’s worth reference. Value reference and time reference shall be used to calculate the projections for the following waves.

Choose/Deselect Waves;
Now, by urgent choose shortcut key you may choose/deselects all objects on the chart.
Deleting all objects:
If you wish to delete all objects on the chart, together with any wave patterns which have been marked utilizing the Elliott Wave Counter, click on on the Delete All button or press the delete all shortcut key.
Deleting the final wave:
Simply click on on one of many sample’s waves, after which press the delete final shortcut key and the final wave of your sample shall be deleted. Press the important thing as many instances as you must attain the specified wave and delete it.
Bind Waves:
You can even press bind shortcut key to maneuver the labels to the excessive and low and arrange it.
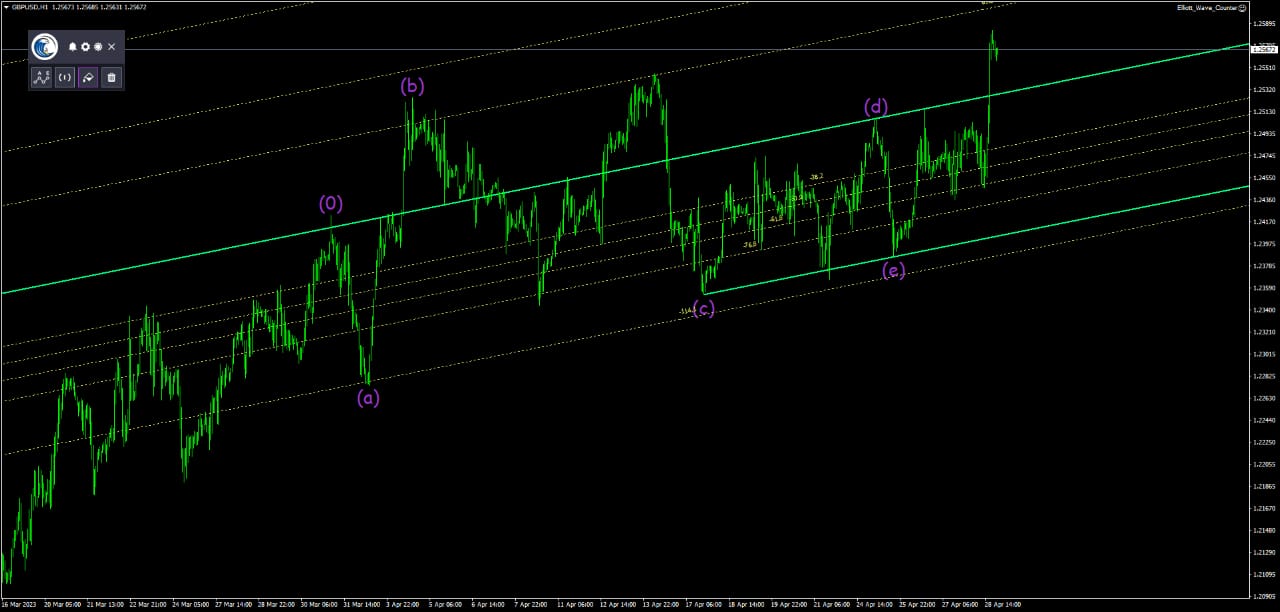
Fibonacci Channel:
When choosing the waves and urgent the Fibo Channel shortcut key, the instrument will show the channels between the waves.
Fibonacci time zones:
When choosing the waves and urgent the Fibo Occasions shortcut key, the instrument will show the Fibonacci time zones between the waves.

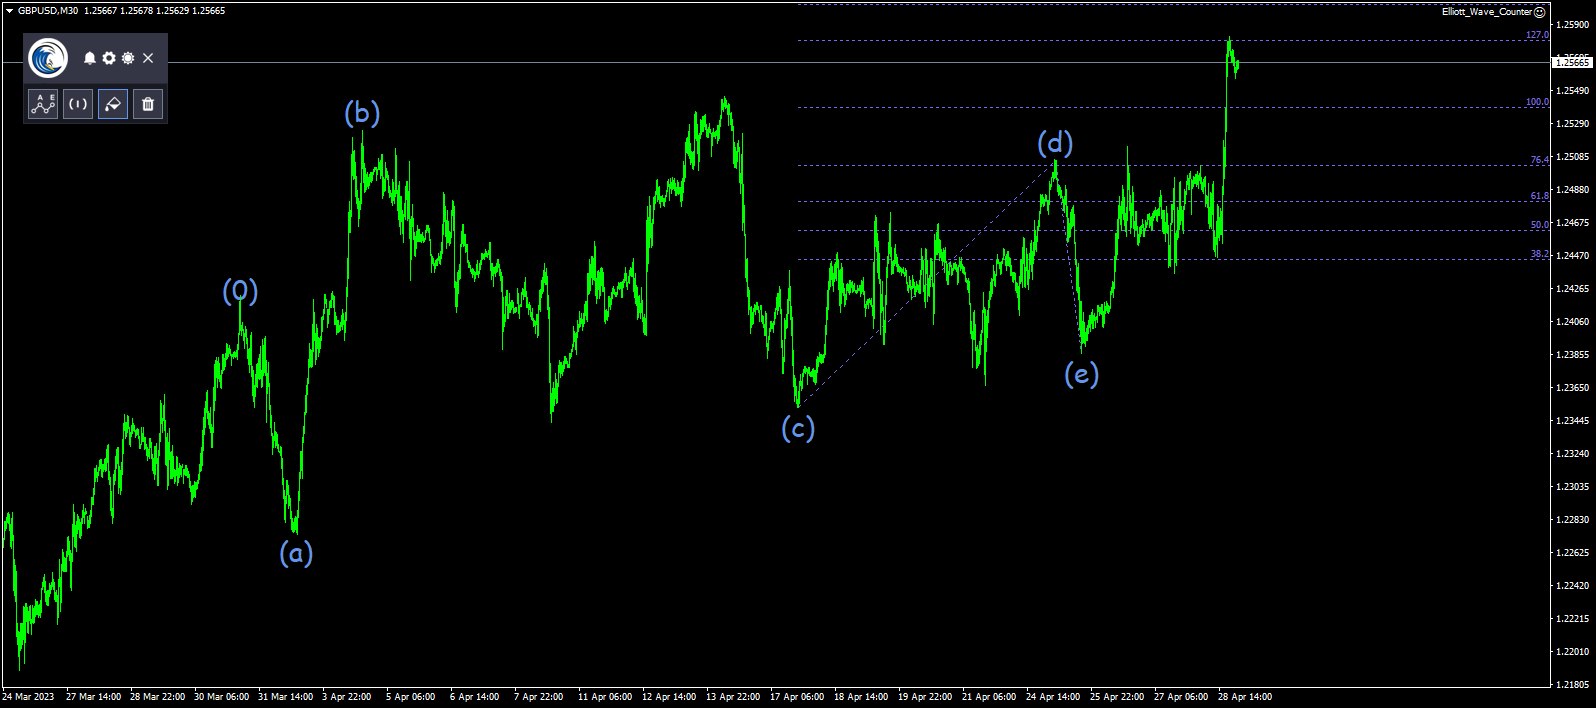
Fibonacci growth ranges:
When choosing the waves and urgent the Fibo Goal shortcut key, the instrument will show the Fibonacci growth ranges between the waves.
Pitchfork ranges:
When choosing the waves and urgent the Pitchfork shortcut key, the instrument will show the Pitchfork ranges between the waves.
Settings Panel Clarification:
The Settings Panel embody totally different tabs to make its simpler to pick and alter the settings.
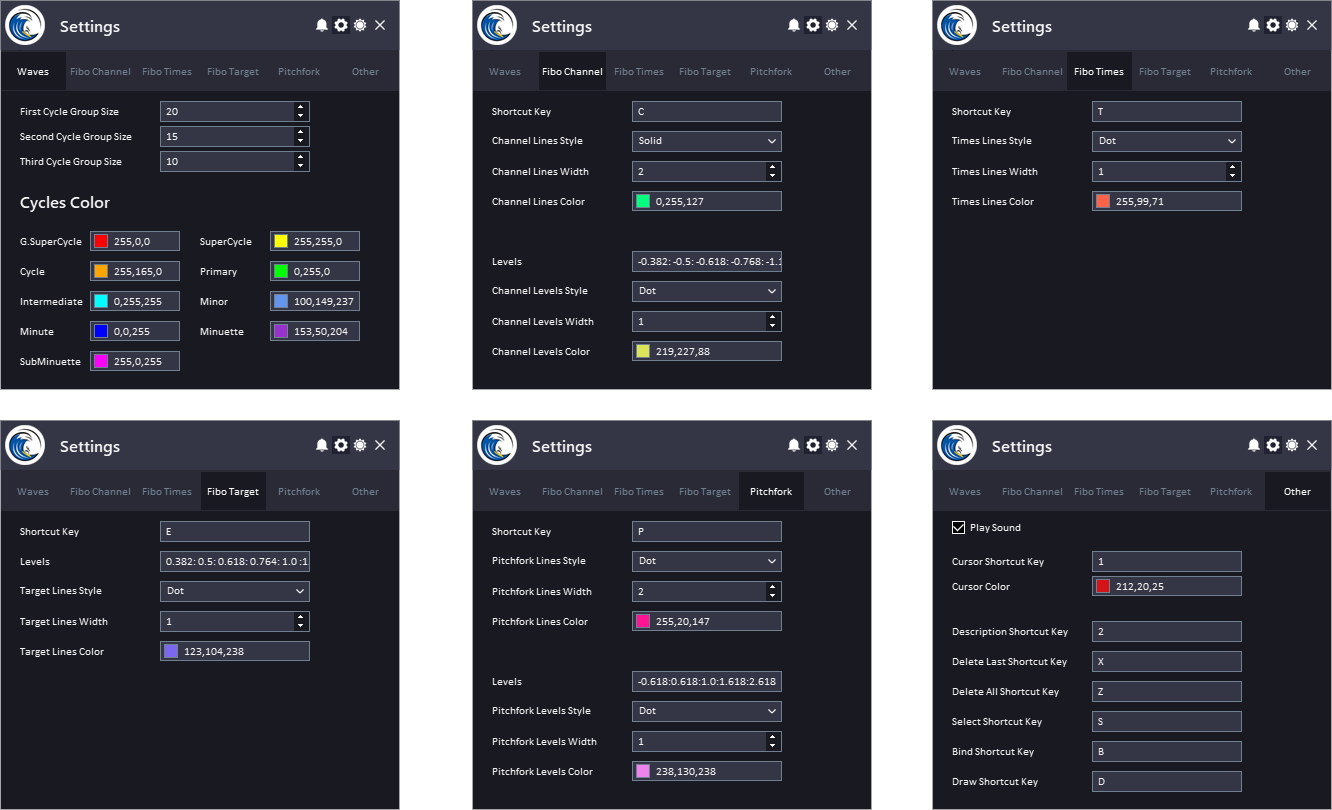
Wave Tab:
On this tab you may specify the dimensions and the colour of the cycles teams that the instrument makes use of to attract Elliott Waves on the chart.
Fibonacci Channel Tab:
The Fibonacci Channel is a technical evaluation instrument utilized by merchants to determine potential help and resistance ranges in a worth chart. Listed here are the inputs for the Fibonacci Channel and their explanations:
-
Shortcut key: This refers back to the keyboard shortcut used to activate the Fibonacci Channel instrument on a buying and selling platform.
-
Ranges: This refers back to the particular Fibonacci retracement ranges used to attract the channel. The most typical ranges used are 38.2%, 50%, and 61.8%, though merchants might use extra ranges based mostly on their buying and selling technique.
-
Line Width: This refers back to the thickness of the traces that make up the Fibonacci Channel. Merchants can alter the road width to make the channel kind of outstanding on the chart.
-
Line Fashion: This refers back to the fashion of the traces that make up the Fibonacci Channel. Merchants can select from totally different kinds, comparable to stable traces, dotted traces, or dashed traces.
-
Colour: This refers back to the coloration of the traces that make up the Fibonacci Channel. Merchants can select from totally different colours to make the channel extra visually interesting or to match their private preferences.
The identical Settings will be utilized on the extent’s traces.
Fibonacci Occasions Tab:
The Fibonacci Time Zone is a technical evaluation instrument utilized by merchants to determine potential help and resistance ranges in a worth chart based mostly on time intervals. Listed here are the inputs for the Fibonacci Time Zone and their explanations:
-
Shortcut key: This refers back to the keyboard shortcut used to activate the Fibonacci Time Zone instrument on a buying and selling platform.
-
Line Width: This refers back to the thickness of the traces that make up the Fibonacci Time Zone. Merchants can alter the road width to make the zones kind of outstanding on the chart.
-
Line Fashion: This refers back to the fashion of the traces that make up the Fibonacci Time Zone. Merchants can select from totally different kinds, comparable to stable traces, dotted traces, or dashed traces.
-
Colour: This refers back to the coloration of the traces that make up the Fibonacci Time Zone. Merchants can select from totally different colours to make the zones extra visually interesting or to match their private preferences.
Fibonacci Goal Tab:
The Fibonacci Growth is a technical evaluation instrument utilized by merchants to determine potential ranges of help and resistance, in addition to potential worth targets, in a worth chart. Listed here are the inputs for the Fibonacci Growth and their explanations:
-
Shortcut key: This refers back to the keyboard shortcut used to activate the Fibonacci Growth instrument on a buying and selling platform.
-
Ranges: This refers back to the particular Fibonacci retracement ranges used to attract the growth ranges. The most typical ranges used are 38.2%, 50%, 61.8%, 100%, 138.2%, 161.8%, 200%, and 261.8%, though merchants might use extra ranges based mostly on their buying and selling technique.
-
Line Width: This refers back to the thickness of the traces that make up the Fibonacci Growth. Merchants can alter the road width to make the growth kind of outstanding on the chart.
-
Line Fashion: This refers back to the fashion of the traces that make up the Fibonacci Growth. Merchants can select from totally different kinds, comparable to stable traces, dotted traces, or dashed traces.
-
Colour: This refers back to the coloration of the traces that make up the Fibonacci Growth. Merchants can select from totally different colours to make the growth extra visually interesting or to match their private preferences.
Pitchfork Tab:
The Pitchfork, often known as the Andrews Pitchfork, is a technical evaluation instrument utilized by merchants to determine potential ranges of help and resistance in a worth chart. Listed here are the inputs for the Pitchfork and their explanations:
-
Shortcut key: This refers back to the keyboard shortcut used to activate the Pitchfork instrument on a buying and selling platform.
-
Ranges: This refers back to the particular ranges used to attract the Pitchfork. The most typical ranges used are the median line, which is drawn from the best excessive or lowest low to the midpoint of the worth motion, and the higher and decrease parallel traces, that are drawn equidistant from the median line at ranges of help and resistance.
-
Line Width: This refers back to the thickness of the traces that make up the Pitchfork. Merchants can alter the road width to make the Pitchfork kind of outstanding on the chart.
-
Line Fashion: This refers back to the fashion of the traces that make up the Pitchfork. Merchants can select from totally different kinds, comparable to stable traces, dotted traces, or dashed traces.
-
Colour: This refers back to the coloration of the traces that make up the Pitchfork. Merchants can select from totally different colours to make the Pitchfork extra visually interesting or to match their private preferences.
The identical Settings will be utilized on the extent’s traces.
Different Settings Tab:
-
Play Sounds: This enter refers to a function that performs a sound impact each time an motion is carried out.
-
Cursor Pointer Shortcut Key: That is the keyboard shortcut used to activate the cursor pointer mode within the Elliott Wave Counter instrument. When this mode is activated, a cursor pointer seems on the chart, and the consumer can transfer it round to find out the optimum placement for the label.
-
Stage Description Shortcut Key: That is the keyboard shortcut used to activate the Stage Description mode within the Elliott Wave Counter instrument.
-
Delete All Shortcut Key: That is the keyboard shortcut used to delete all of the wave markers on the chart directly.
-
Delete Final Shortcut Key: That is the keyboard shortcut used to delete the final wave marker added to the chart.
-
Draw Shortcut Key: That is the keyboard shortcut used to activate the drawing mode within the Elliott Wave Counter instrument.
-
Bind Shortcut Key: That is the keyboard shortcut permits the consumer to connect the wave depend label to the worth level on the chart, such because the excessive or low of a candle. This may also help arrange the labels on the chart and make it simpler for the consumer to maintain monitor of the wave depend.
-
Choose Shortcut Key: That is the keyboard shortcut used to activate the choice mode within the Elliott Wave Counter instrument. This enables the dealer to pick and modify current wave on the chart.
Notifications Panel Clarification:
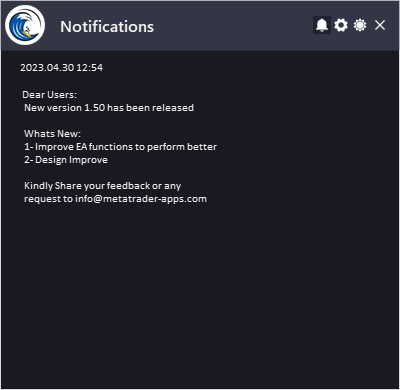
The Date refers back to the date and time when the notification was generated.
The Notification refers back to the message that’s displayed. This will embody details about the EA or the updates or message from the developer.
To permit EA getting the notifications, you must add our web site hyperlink to the listing of allowed URLs within the platform’s settings.
Listed here are the steps so as to add a hyperlink to the allowed URLs listing in MetaTrader (Examine The Picture Beneath):
- Open the MetaTrader platform and go to “Instruments” within the prime menu, then choose “Choices”.
- Within the “Choices” window, click on on the “Professional Advisors” tab.
- Examine the “Enable WebRequests for listed URL” choice and click on on the “Add” button.
- Within the “New URL” discipline, enter the URL that you just wish to enable net requests for (http://metatrader-apps.com).
- Click on “OK” to avoid wasting the URL to the listing of allowed URLs.
[ad_2]