
[ad_1]
Image this: You’re in a Zoom assembly, and your coworker joins — however he’s unintentionally added a filter that makes him seem like an lovable pet and he doesn’t know methods to take away it. It’s a viral video within the making, however nobody is recording the decision. You have to no less than take a screenshot to share within the Watercooler Slack channel so everybody on the firm can get a kick out of this, however there’s only one downside: You don’t know methods to take a screenshot on a Mac.
Taking a display seize on a Mac laptop is important for extra than simply capturing hilarious Zoom fake pas. You’ll be able to take screenshots to share info with colleagues, present examples of bugs — you’ll be able to even mark up your screenshots to make visible directions. And MacOS makes screenshots simple with keyboard shortcuts you’ll be able to be taught in minutes.
Mockup
A mockup is a static design used to showcase how an internet site or an software would possibly look. Individuals use mockups to assist consider potential designs with out coding the precise software or web site.
So right here’s your likelihood to by no means miss one other hilarious second with out documenting it — learn on to learn to take a screenshot on a Mac (plus another time-saving shortcuts all Mac customers ought to know.
4 Methods to Take a Screenshot on a Mac
There are literally many various methods to take screenshots on a Mac, relying on the kind of screenshot you want. All of those use Apple’s built-in screenshot software, so there’s no want for third-party apps or instruments.
For every kind of screenshot, you’ll press command. Then, whereas nonetheless holding it down, press shift and a quantity.
| Command + Shift + 3 | Screenshot your total display |
| Command + Shift + 4 | Screenshot a specific portion of the display |
| Command + Shift + 5 | Open the screenshot menu |
| Command + Shift + 6 | Screenshot the Contact Bar, in case your Mac has one |
Take a look at the several types of screenshots beneath for the keyboard shortcuts and a few extra details about every.
Easy methods to Screenshot Your Whole Display
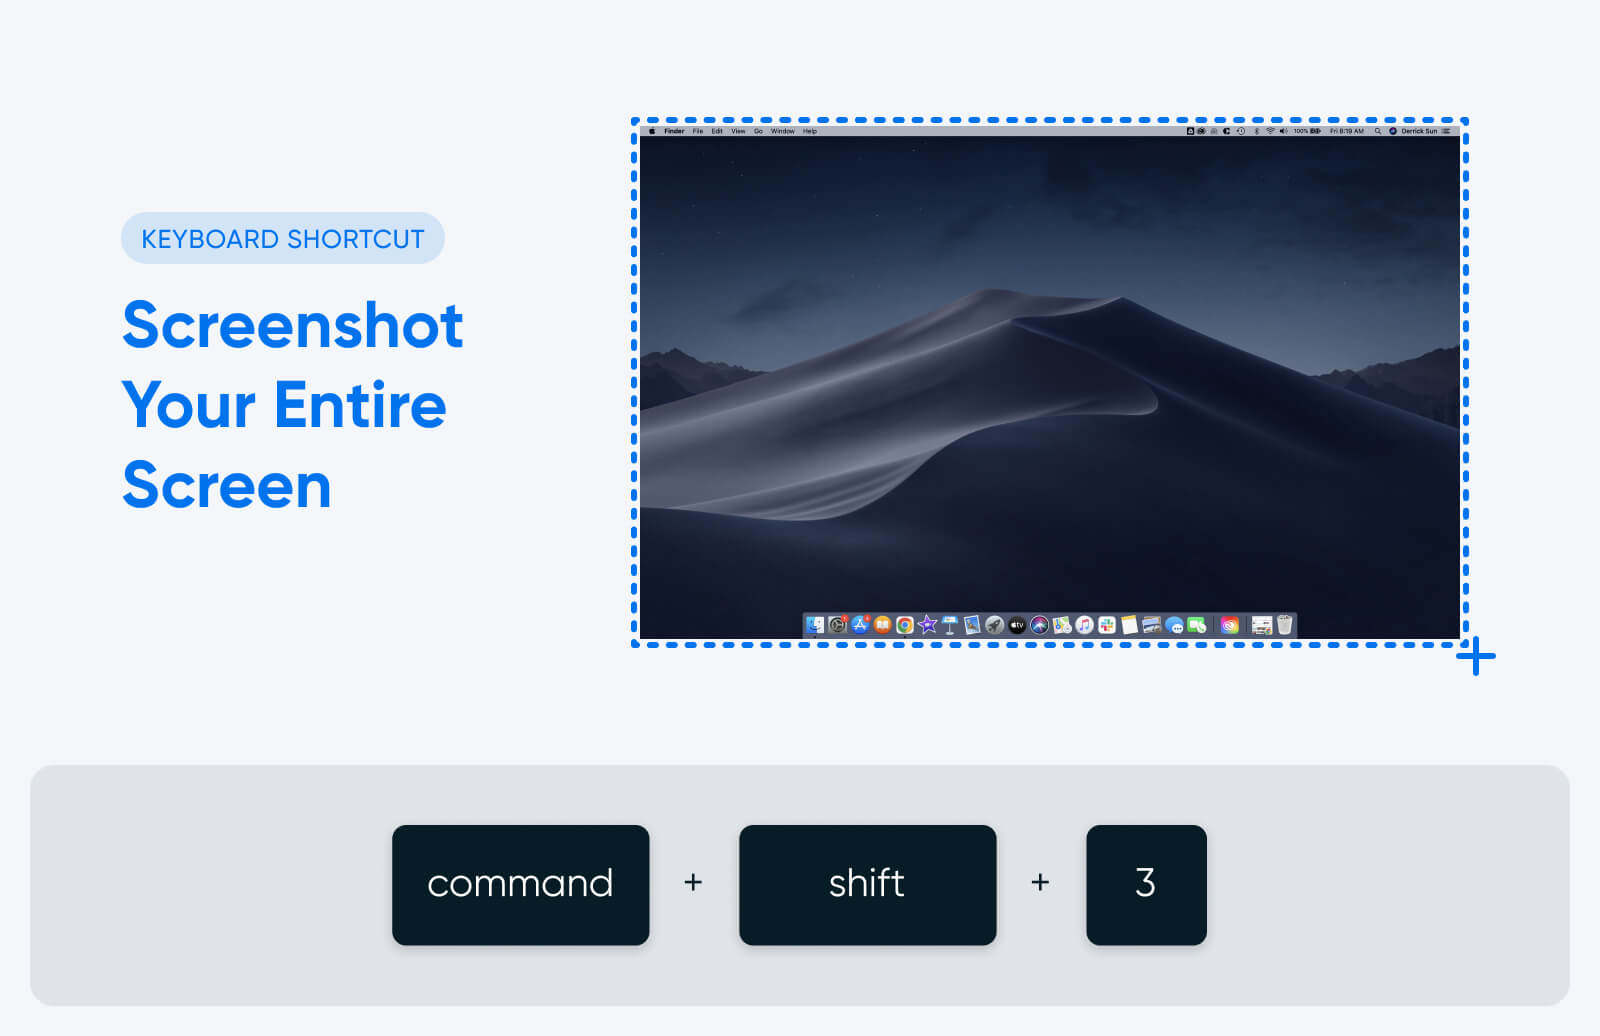
In case you want a screenshot of your entire display, use this shortcut:
Command + shift + 3
This shortcut will work whether or not you’re in full-screen mode or have a number of home windows seen in your display. Notice that in case you’re utilizing a number of displays, this shortcut will take and save a screenshot of every one concurrently.
Easy methods to Screenshot A part of Your Display
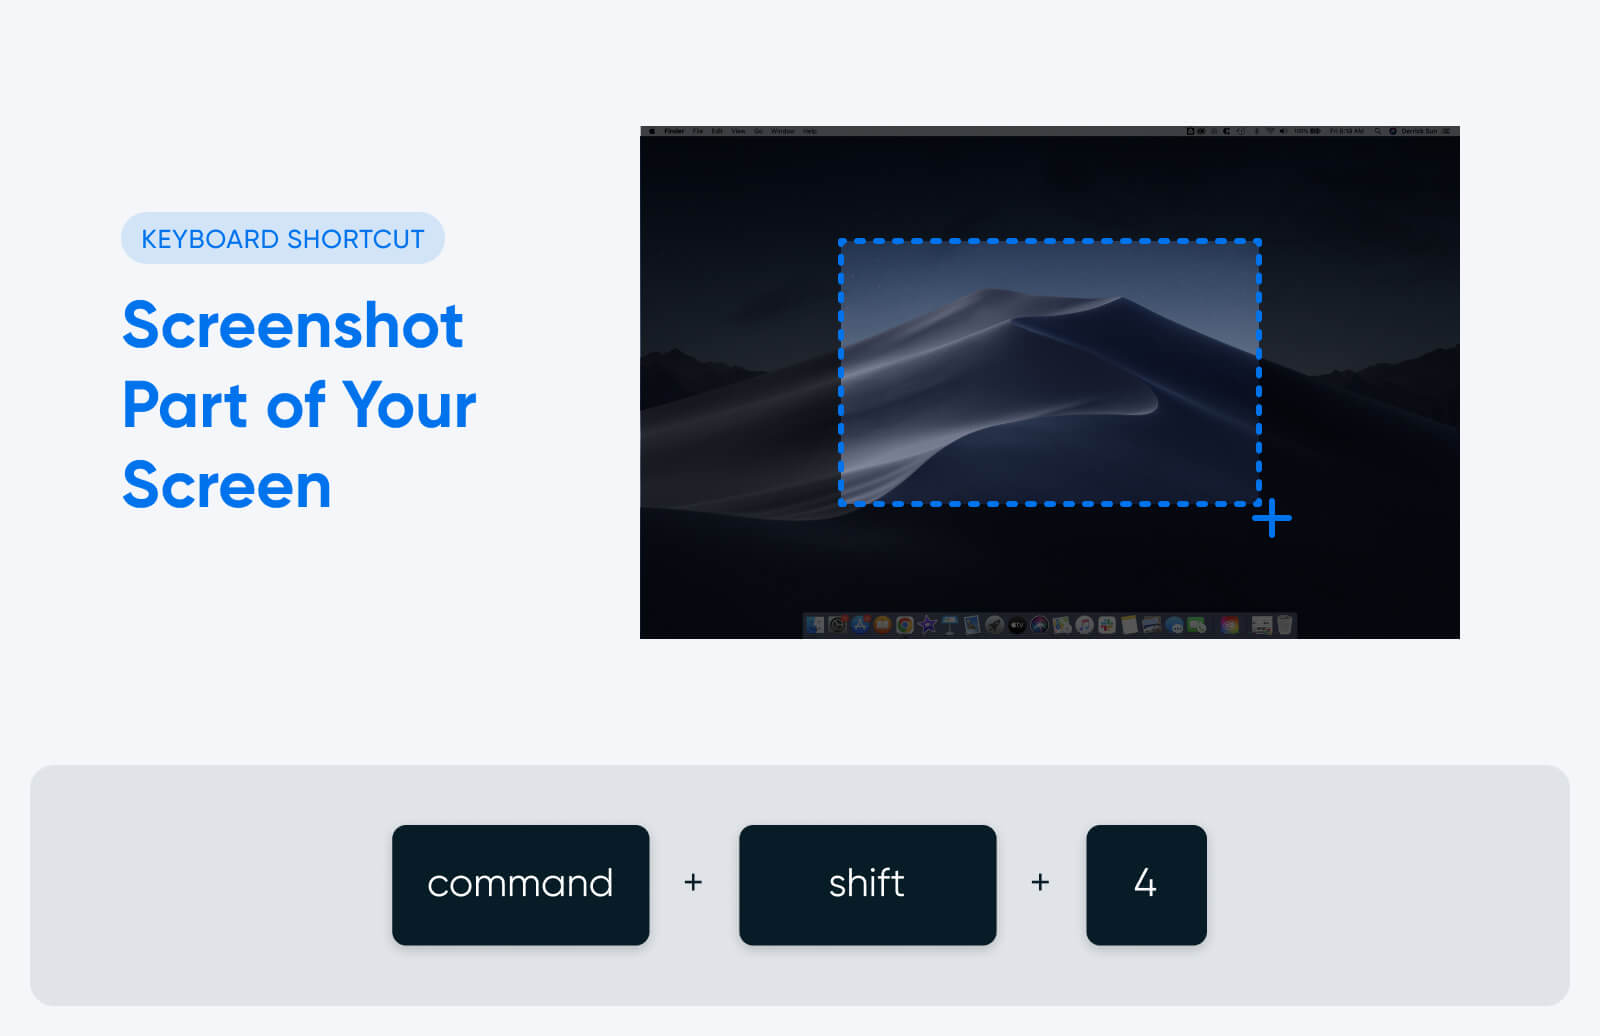
In case you don’t want a screenshot of the complete display, however somewhat a specific space or a part of the display, use this shortcut:
Command + shift + 4
As soon as you employ the shortcut, your cursor will flip right into a crosshair. Use your mouse button or trackpad to click on and drag the crosshair to pick the a part of the display you need to seize. Let go when you have got the entire space you need contained in the screenshot field, or press the Esc key to cancel the screenshot.
There are a number of extra methods you should utilize this shortcut:
- Press Command + shift + 4 after which hit the spacebar. This may flip your mouse pointer right into a digicam icon, and as an alternative of clicking and dragging to pick an space to your screenshot, you’ll be able to click on on a selected window to seize it.
- After clicking and dragging to create your screenshot space, press and maintain the spacebar. This may lock the dimensions and form of the field. You’ll be able to then drag it anyplace on the display, and launch the spacebar to take your screenshot.
- After clicking and dragging to create your screenshot space, press and maintain the Shift key to regulate the peak and width of the chosen space. Press Shift to toggle between top and width. Let go of the mouse button or trackpad to take the screenshot.
Easy methods to Screenshot the Contact Bar
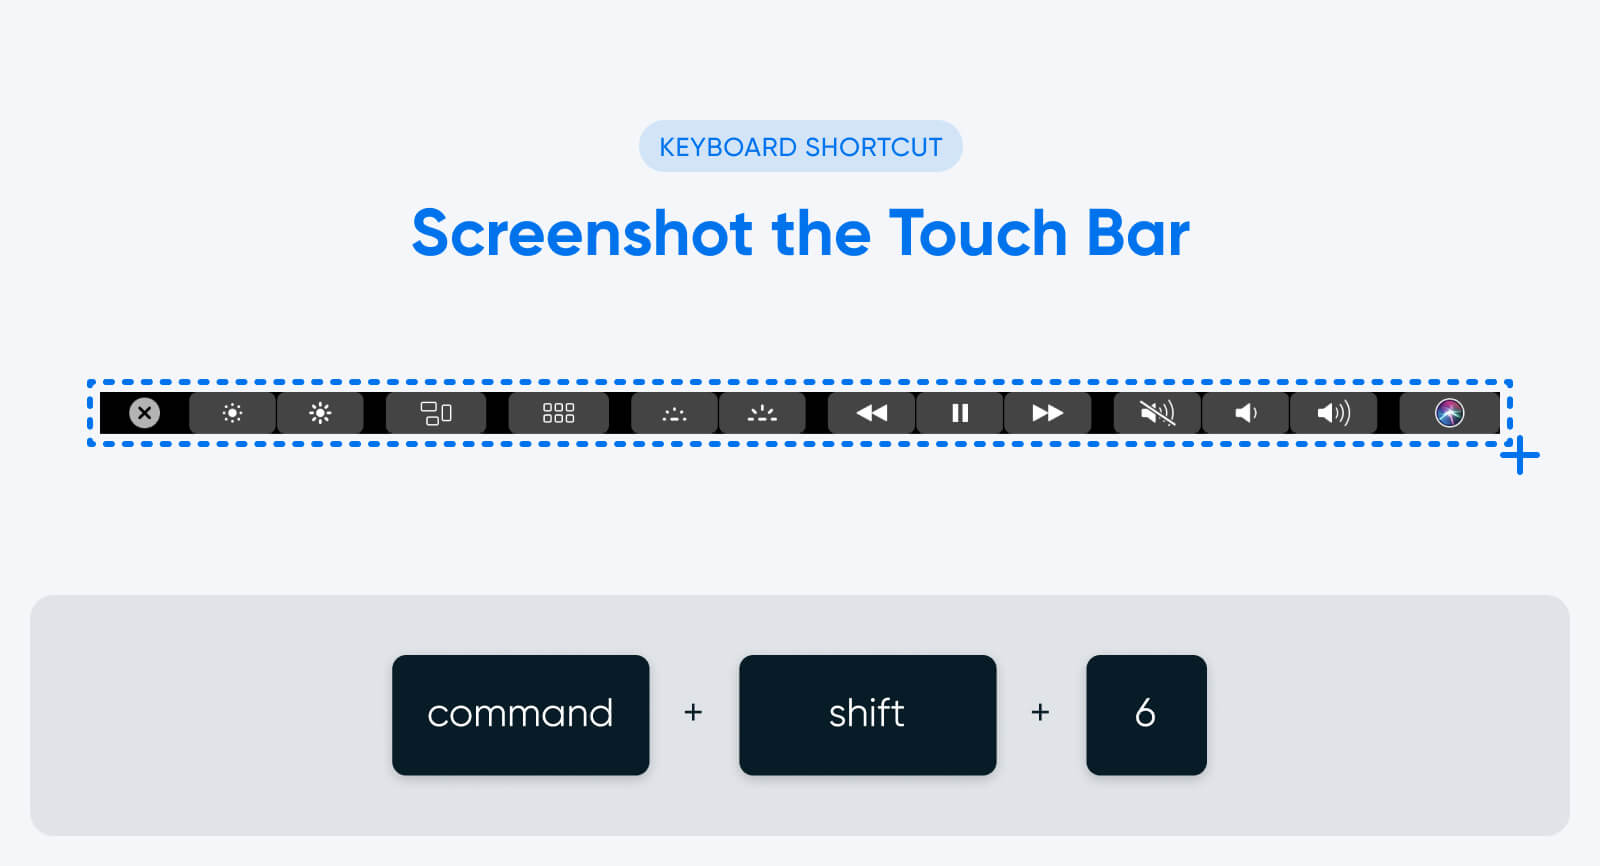
Not each Mac laptop has a Contact Bar, however some fashions of the Macbook Professional include this backlit toolbar constructed into the keyboard. It replaces the operate keys and serves as a menu bar for quantity, brightness, video playback controls, and extra.
On a Mac that has a Contact Bar, you’ll be able to screenshot it through the use of this shortcut:
Command + shift + 6
This may seize the whole lot exhibiting within the Contact Bar on the time you took the screenshot.
Easy methods to Open the Screenshot App
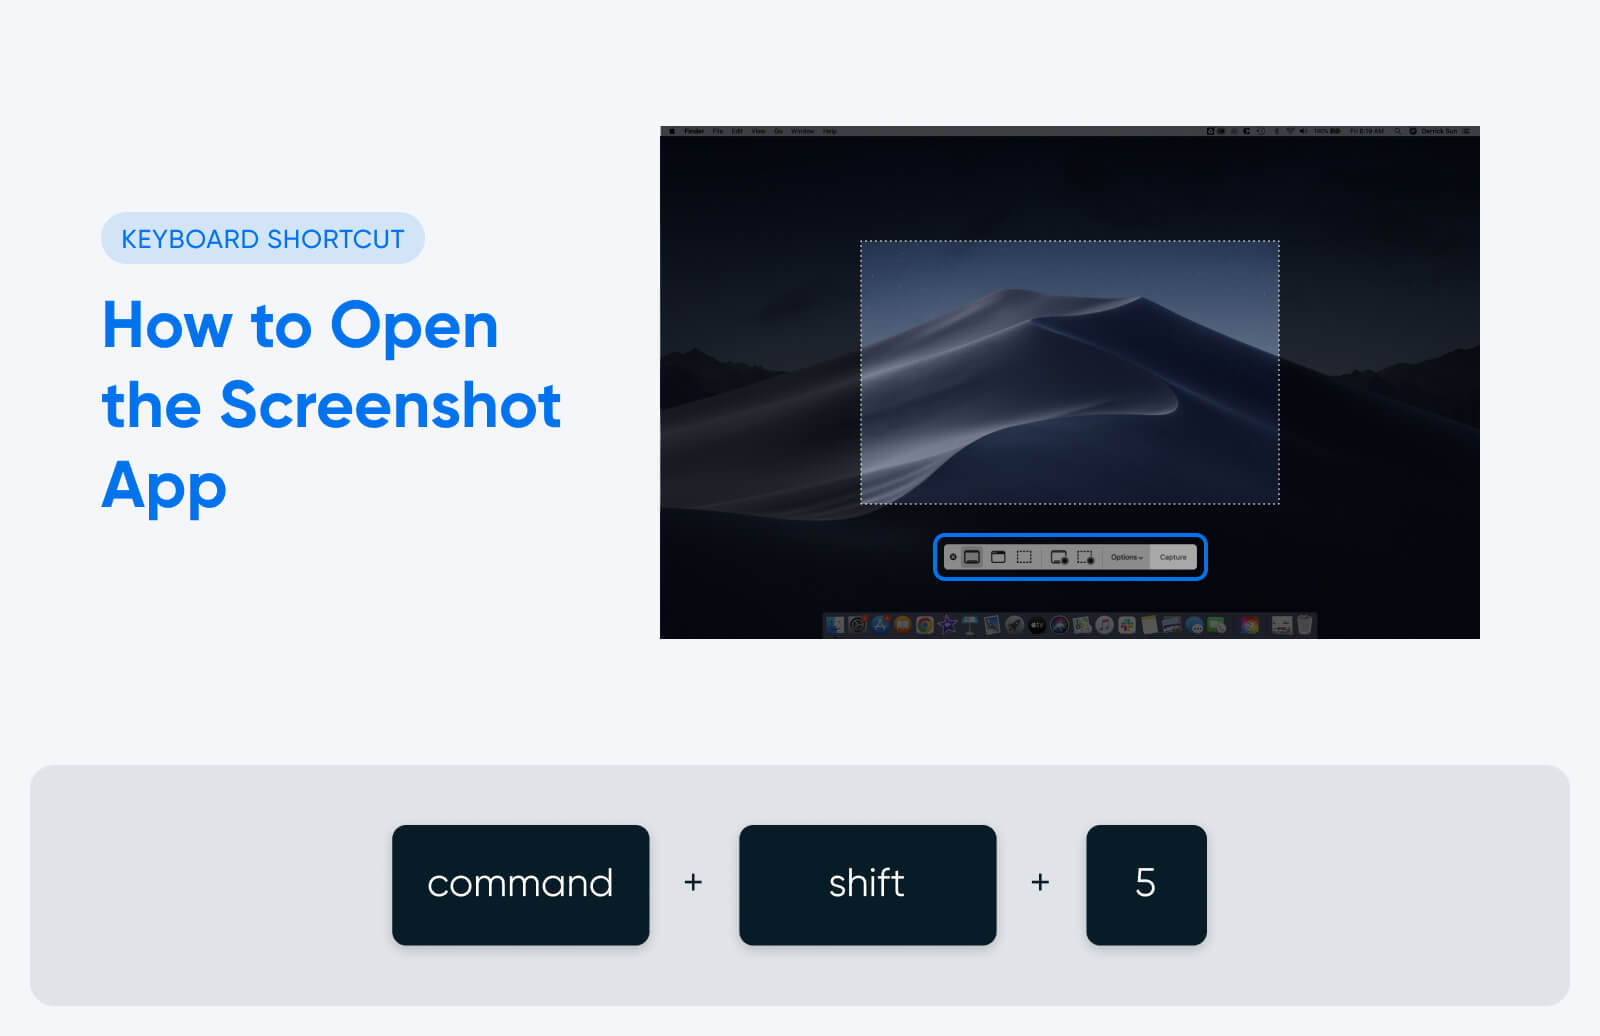
Sure Mac working programs (together with MacOS Mojave, Catalina, Massive Sur, Monterey, and Ventura) have a built-in screenshot app that gives much more display seize options and choices.
To open the screenshot app, use this shortcut:
Command + shift + 5
The icons on the left facet of the menu let you take a screenshot. From left to proper, clicking the icons will let you:
- Screenshot your total display
- Screenshot a specific window
- Screenshot a specific portion of your display
When you’ve chosen the choice you need, click on the “Seize” button on the far proper of the menu to take and robotically save the screenshot.
The screenshot app additionally has an “Choices” menu that means that you can customise how your Mac takes and saves screenshots. For instance, in case you click on “Choices,” then “Present Floating Thumbnail,” you’ll be able to customise whether or not a thumbnail preview of your screenshot seems within the nook of your display proper after taking it. You may as well customise how and the place your screenshots are saved (however extra on that in a minute).
Easy methods to Take a Display Recording on a Mac
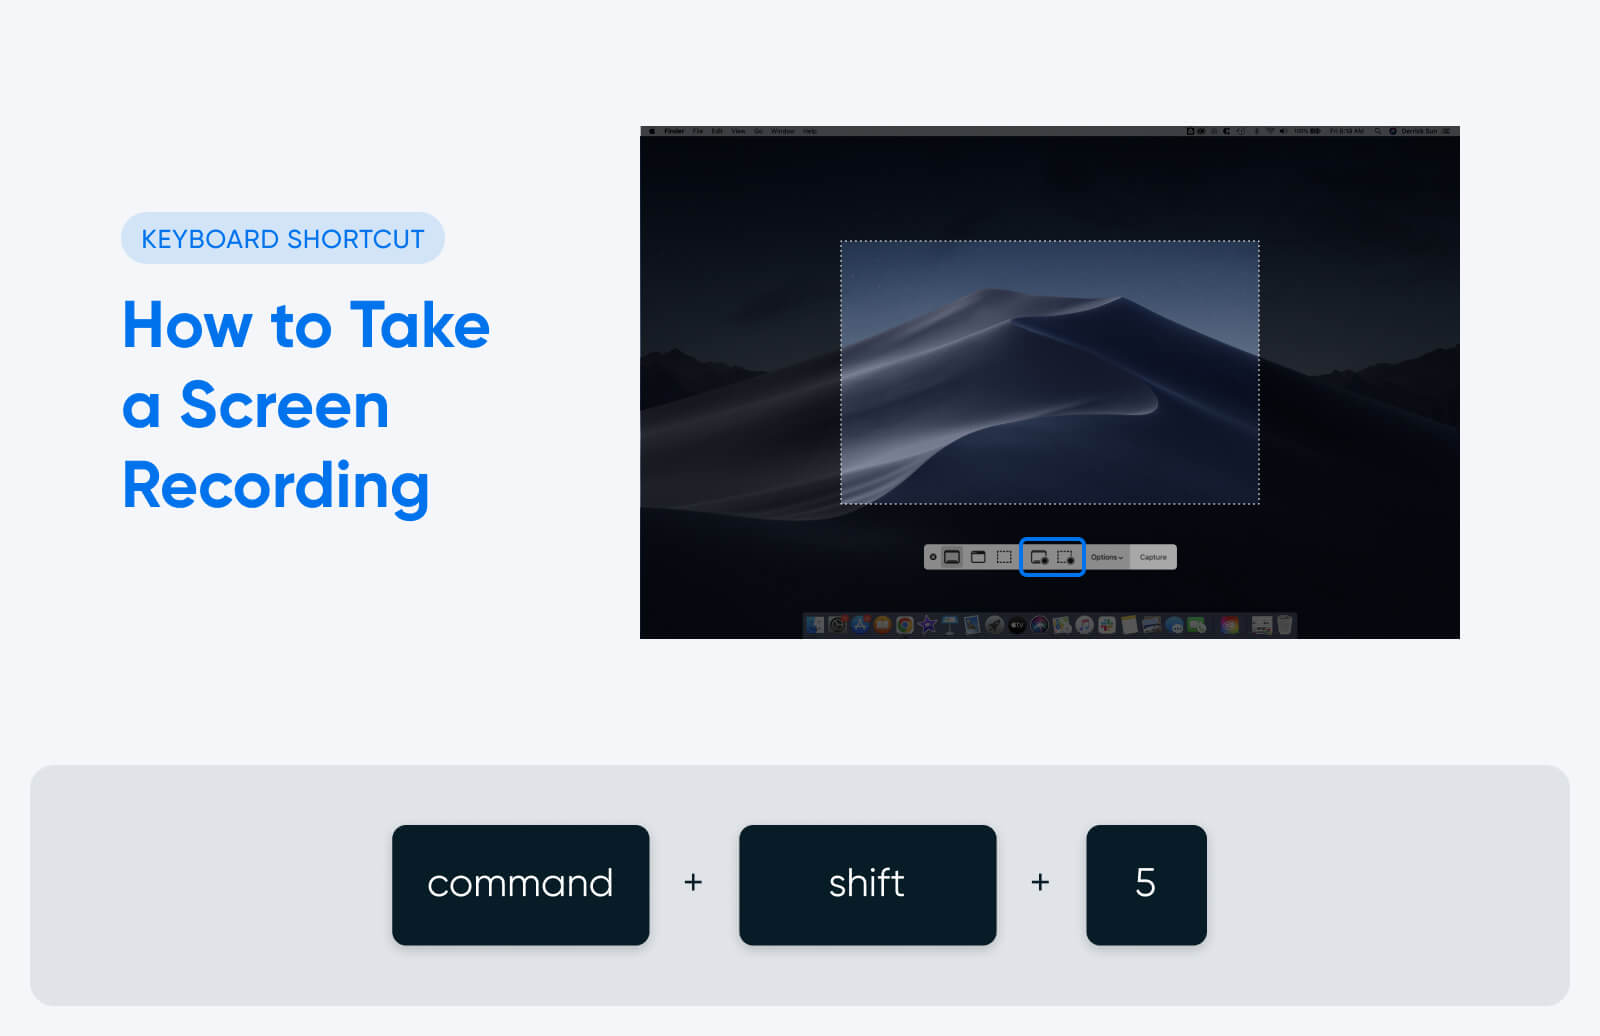
Screenshots are static photos of a single second in time in your display. Display recordings are movies that present the whole lot occurring in your display over a number of seconds or minutes — nice for giving somebody visible directions on methods to do one thing cool on their Mac, for instance.
To take a display recording with out a third-party software, you’ll want a Mac with an working system put in that helps the built-in screenshot app. Open it with this shortcut:
Command + shift + 5
Then, use one of many two buttons instantly to the left of the choices menu. The left button will report your total display, whereas the fitting button will report only a portion of the display you choose.
After you choose the kind of display recording you need to take, click on on the display to start recording. A black circle icon with a white sq. within the heart will seem within the menu bar on the prime, proper facet of your display. Click on this icon once you need to cease recording, and your video will robotically save to your desktop (or wherever you’ve chosen, in case you’ve custom-made your screenshot saving choices).
Easy methods to Screenshot on an iPhone
To take a screenshot on an older iPhone, press the House button and the Energy button (on the fitting facet of the iPhone) concurrently.
When you’ve got an iPhone X or newer (with out a House button), press the Aspect and Quantity Up buttons as an alternative.
You’ll see a flash on the display and listen to the sound of the digicam shutter in case your telephone isn’t on silent. The screenshot will likely be saved in your Pictures app beneath the “Screenshots” album.
In case you take a screenshot on an iPhone and must share it with a Mac, you are able to do so wirelessly utilizing Airdrop. Right here’s how:
- Open the screenshot in your Pictures app.
- Faucet the “Share” button (the sq. with an upward arrow).
- Scroll down and faucet on “AirDrop.”
- Be certain that your Mac is close by and has AirDrop enabled.
- Your Mac ought to seem as an icon within the AirDrop part. Faucet on it to ship the screenshot.
- In your Mac, a window will seem asking you to just accept the AirDrop switch. Click on “Settle for” to save lots of the screenshot in your Mac.
The place to Discover Your Mac Screenshots After You Take Them
Proper after you are taking a screenshot, it would seem as a preview within the backside proper nook of your display. You’ll be able to click on the preview to open the screenshot, change the dimensions or crop, add annotation, or make different edits.
By default, screenshots save to your desktop. You may as well discover them by going to the “Desktop” tab in Finder.
Within the screenshot app, you will discover an choices menu that means that you can change and customise how your screenshots are saved. For instance, in order for you them to save lots of to a selected screenshots folder you create (as an alternative of your desktop), you’ll be able to set that up within the choices menu. Older Macs that also must improve their working programs to incorporate the screenshot app is not going to have this feature.
20 Different Mac Shortcuts You Ought to Know
You should utilize keyboard shortcuts in your Mac to do way more than simply seize screenshots.
Developer Bruno Michels documented an experiment the place he discovered that he might save as much as 5 seconds each single time he did a fundamental motion (like copying and pasting some textual content) with a keyboard shortcut as an alternative of along with his mouse.
After experimenting and measuring, Michels developed a components to find out how a lot time he might save over the course of a complete yr by using keyboard shortcuts. In response to his math, the typical particular person wastes 134 hours per yr utilizing their mouse as an alternative of their keyboard to carry out most simple laptop duties. That’s a complete of 17 work days — virtually a full month of labor.
With that in thoughts, these are the time-saving Mac shortcuts that everybody ought to know:
| Shortcut | Perform |
| Command + c | Copy highlighted textual content or photos |
| Command + v | Paste |
| Command + shift + v | Paste with out formatting |
| Command + a | Choose all |
| Command + z | Undo |
| Command + x | Reduce |
| Command + w | Shut the window you might be lively in |
| Command + possibility + w | Shut all open app home windows |
| Command + , (comma) | Open Preferences for the app you might be lively in |
| Command + m | Reduce the entrance app window to the dock |
| Command + possibility + m | Reduce all open home windows to the dock |
| Command + tab | Tab by all open apps |
| Command + ` | Tab by all home windows within the app you might be lively in |
| Command + area | Open Highlight to go looking your Mac |
| Command + L | Navigate to the URL bar in an lively internet browser |
| Command + possibility + d | Present or cover the dock |
| Command + management + q | Immediately lock your Mac |
| Choice + shift + quantity | Alter your Mac’s quantity in small increments |
| Management + command + area | Open the Character Viewer to insert emojis 👍 |
| Choice + command + esc | Power stop an app that’s stopped responding |
Bonus: Easy methods to Customise Your Mac Shortcuts
Probably the greatest issues about Apple merchandise is that they’re designed to be intuitive, user-friendly, and customizable. That goes to your keyboard shortcuts, too.
In case you don’t love Apple’s pre-set keyboard shortcuts, do you know you’ll be able to create your individual?
Simply open up System Preferences, then click on “Keyboard,” then “Shortcuts.” From there, you’ll be able to view all of your Mac’s built-in shortcuts — and customise them if you wish to.
Now, not solely have you learnt methods to take a screenshot on a Mac, however you’re additionally armed with all of the information you could develop into an Apple energy consumer. Good luck shortcutting, and luxuriate in on a regular basis you’ll save utilizing your Mac.
Get Content material Delivered Straight to Your Inbox
Subscribe to our weblog and obtain nice content material similar to this delivered straight to your inbox.
[ad_2]